
Squirrel Proof of Concept: A Step-by-Step Walkthrough
28 min read · Last updated · Page version 7
This page takes you through a Squirrel proof of concept in order, from an empty portal to a file archived and restored, so you can see for yourself how it behaves on your own content. Work through it top to bottom; each step says what to do and how to tell it worked.
Every step links to the full reference page for that feature, so you can go deeper wherever you need to without reading everything first.
Two things to know before you start, because they explain most of the confusion in a proof of concept:
The policy only governs the automated run. Age thresholds, minimum file size and exclusions decide what the scheduled archiving job picks up on its own. They do not apply when you archive something by hand. A manual archive - the button in SharePoint, an on-demand archive from the portal, a folder, a whole site - takes exactly what you selected, however new or small it is.
That is useful: it means you can prove the archive and restore round trip in Step 7 straight away, on any file you like, without waiting for a policy to match anything. Testing the policy itself is a separate exercise, and Preview in Step 5 is how you do it.
The default policy will not match a fresh test file. The three settings in Step 2 are where nearly every stalled proof of concept goes wrong, and nothing will tell you why. Two minutes there saves a day of wondering.
Plan for more than one day. Everything scheduled happens at midnight, local time - both the archiving run and the deployment that puts the Archive and Restore buttons into SharePoint. So a site you enable this afternoon has no buttons in SharePoint until tomorrow morning. Work through Steps 1 to 6 on day one, and you will come back the next day to buttons in place and a first policy run already behind you.
Before you start
You need:
- A Squirrel administrator account. Archive administrators can run archive and restore jobs but cannot change policy, so they cannot complete this guide. See console access and roles.
- Your tenant's Squirrel portal URL. It is specific to your company and comes from SmiKar. Signing in uses your Microsoft 365 credentials with MFA - see logging in.
- A SharePoint site you are happy to archive from. Pick this deliberately - see Step 1.
- Azure storage connected. Normally done during onboarding. Check the Azure fields are populated in global settings before you start.
One thing to know up front: Squirrel archives document library content only. OneNote notebooks, SharePoint pages, Site Assets and SharePoint agents are not archived, so do not use those as your test files.
Step 1: Choose the test site
Use a site with genuinely old content in it. A site created for the proof of concept has nothing old enough to archive, which means you end up loosening the policy until it archives everything - and then the test proves nothing about how Squirrel would behave in production.
If you are not sure which site to use, the Site Activity analytics page ranks every site by days since last activity. Sorting by that column gives you a dormant site with real content, which is exactly what you want.
Avoid a site whose files are actively shared with people outside the team. When Squirrel archives a file, the file's existing sharing links are released - the stub does not carry them. That is correct behaviour, but it is an unwelcome surprise if it happens to a document people are still working on.
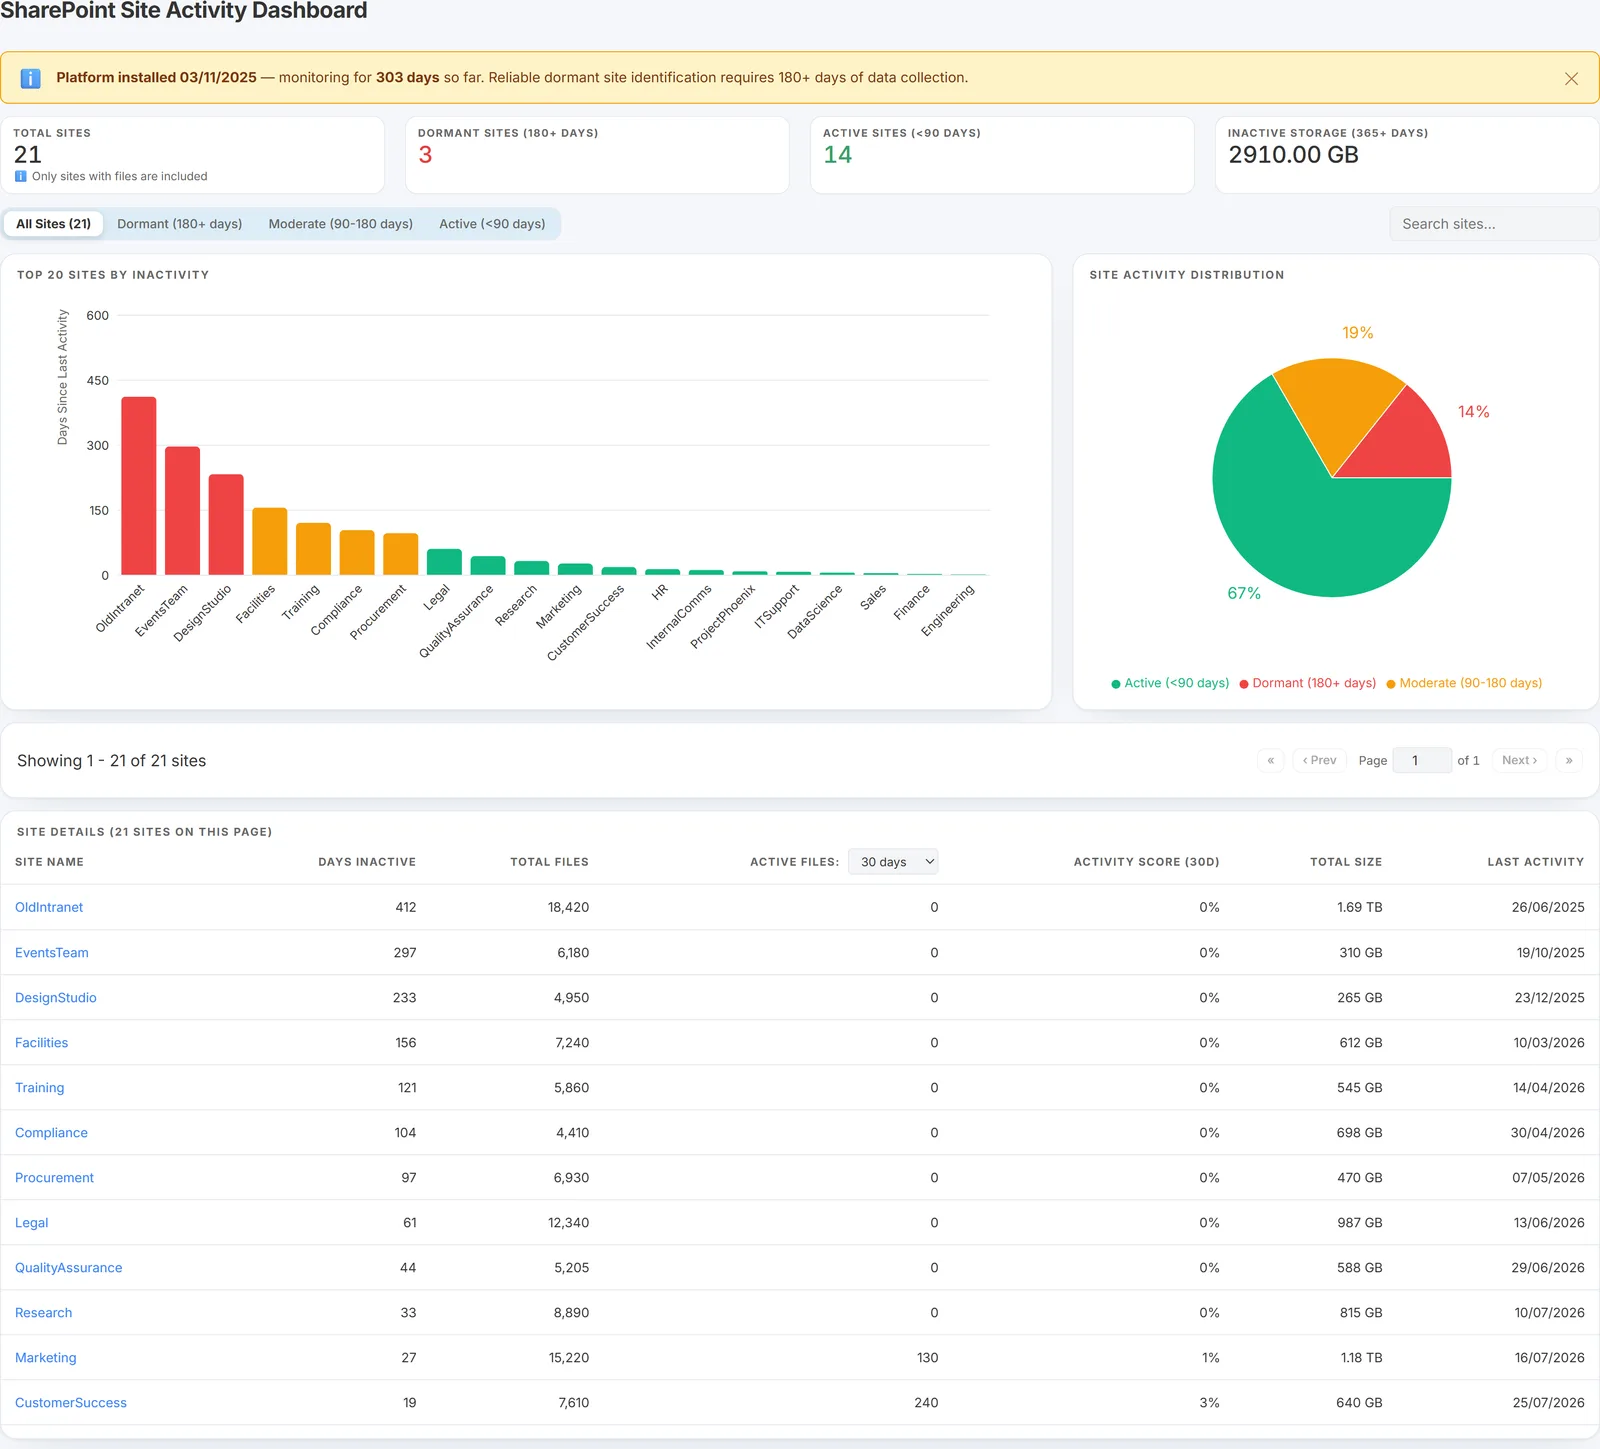
How you know it worked: you have a site URL, and you know roughly how old its content is.
Step 2: Set the archiving policy
Open global settings. These are the tenant-wide defaults that decide which files are eligible anywhere.
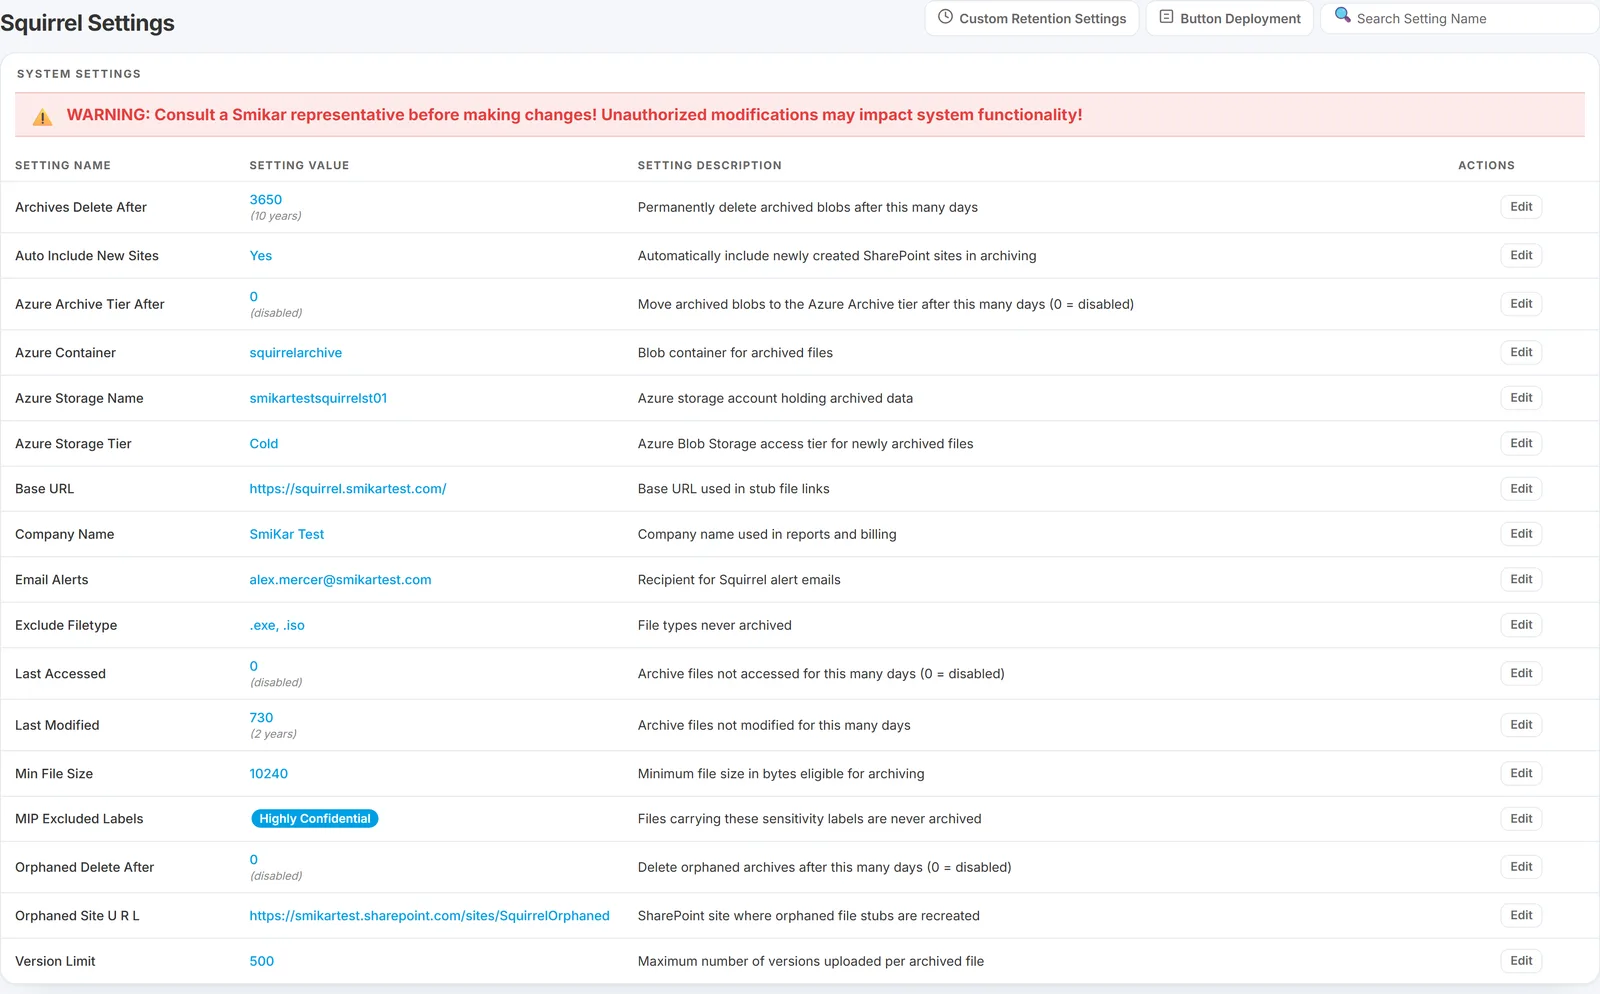
Three of them decide whether your test will do anything at all - and in the screenshot above they are all still at their defaults:
| Setting | Default | Why it matters in a proof of concept |
|---|---|---|
| Last Modified | 730 (two years) | A file must not have been modified for this many days. At the default, anything you created this week is two years away from being eligible. This is the single most common reason a proof of concept appears to do nothing. |
| Last Accessed | 0 (disabled) | Same idea for last access. Disabled by default, so only Last Modified applies unless you turn it on. If you set both, a file has to satisfy both before it is archived. |
| Min File Size | 10240 bytes (10 KB) | Files smaller than this are never archived. A quick test file with one line of text in it is well under 10 KB and will be skipped silently. |
For a proof of concept, set Last Modified to something your test content can actually satisfy - 30 or 60 days against a dormant site - and make sure your test files are comfortably over 10 KB.
While you are on this page, check you are not being tripped up by the other filters. On the automated run, a file is archived only if it passes all of these:
- The site is included in the archiving policy (Step 3).
- It is older than the Last Modified threshold, and the Last Accessed threshold if you have set one.
- It is larger than Min File Size.
- Its extension is not in Exclude Filetype.
- It does not carry a label listed in MIP Excluded Labels.
- Its path does not match Wildcard Exclusion.
- It is not in a library or path you have excluded - see excluded libraries and paths.
None of these apply to a manual archive. If you select a file and archive it yourself, it is archived - the filters are not consulted.
How you know it worked: the settings save, and you can state in one sentence what your scheduled run now archives - for example "anything not modified in 60 days and over 10 KB".
Step 3: Include the test site
A site is only archived if it has been included. Auto Include New Sites is off by default, so newly discovered sites sit excluded until somebody adds them.
Open Site Archive Settings and find your site in the list. See site settings. If you are including several sites at once, or want to paste a list of URLs, use bulk site management instead.
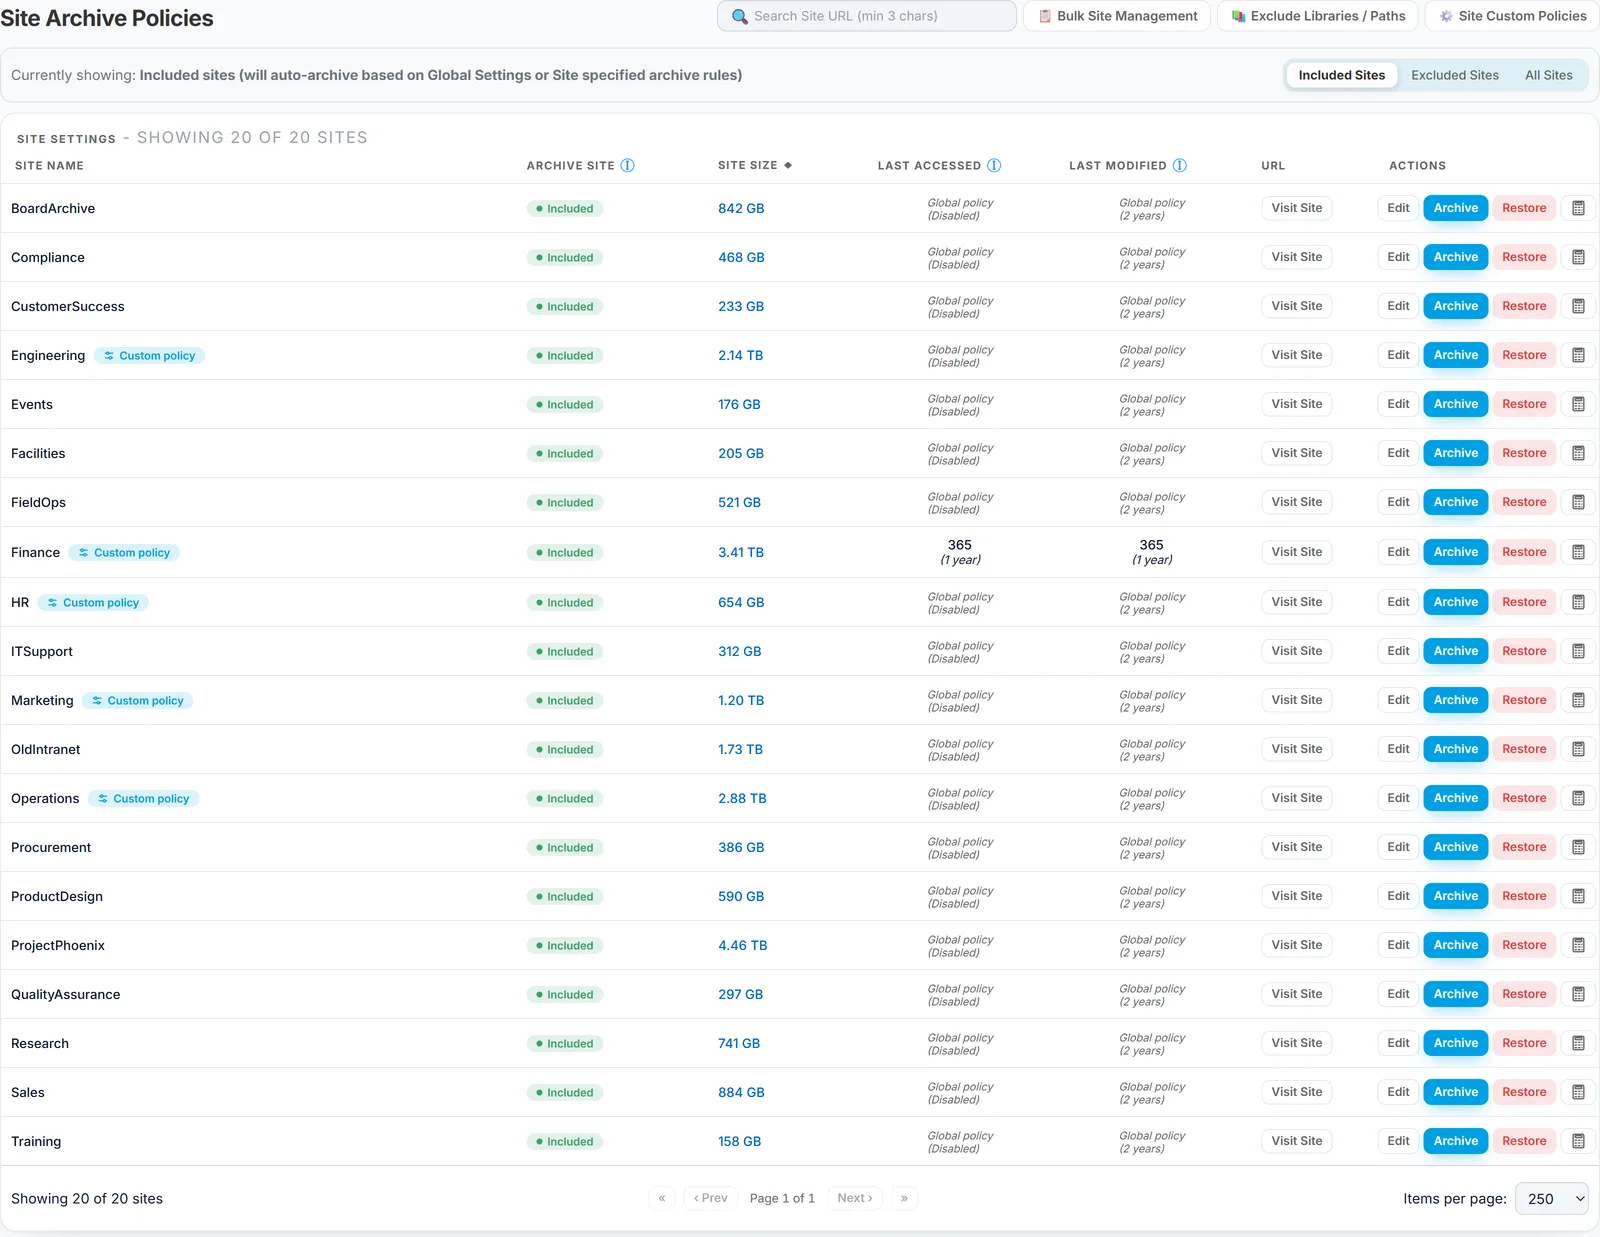
The Last Accessed and Last Modified columns show what each site is actually using. A site reading Global policy (2 years) is inheriting the tenant default; one showing a number has its own override, which is Step 4.
How you know it worked: your site shows as Included in the site list.
Step 4: Set the per-site thresholds
Global settings apply everywhere. You can also give one site its own age thresholds, which is usually what you want in a proof of concept - it lets you be aggressive on the test site without touching the rest of the tenant.
On the site's row, click Edit. Two fields matter here:
- Accessed Days - archive files not accessed in this many days.
- Modified Days - archive files not modified in this many days.
Entering 30 in Modified Days means files on this site that have not been modified for 30 days become eligible, regardless of the tenant default.
You can also set per-site file-type and minimum-size rules from site custom policies. A per-site value always overrides the global one for that setting.
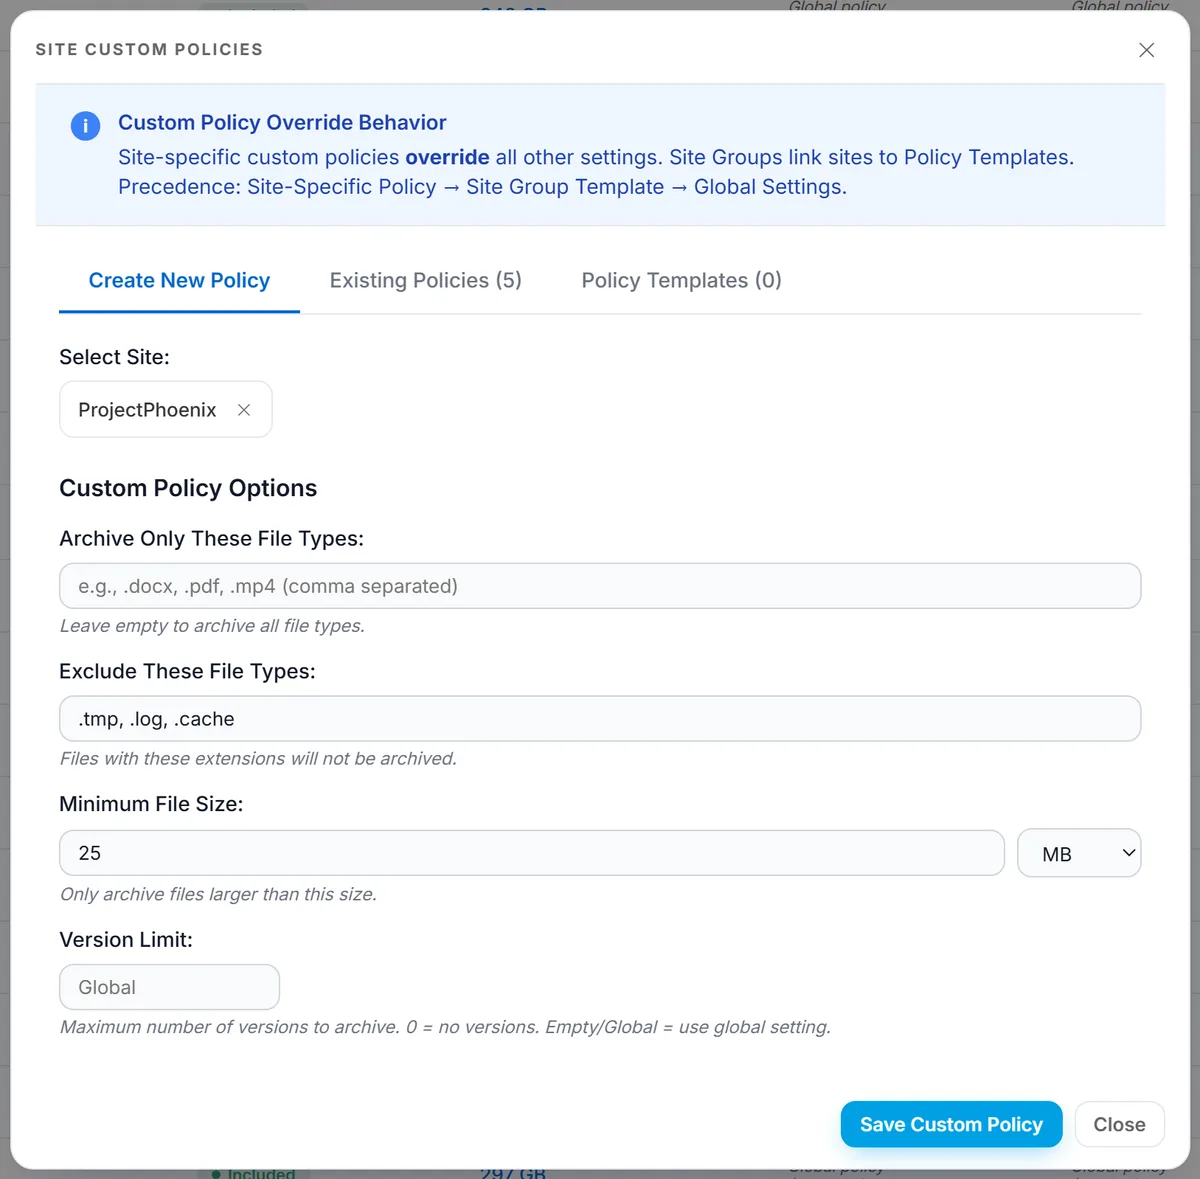
How you know it worked: reopening Edit shows the values you entered.
Step 5: Preview before you archive anything
This is the step that makes a proof of concept safe to run, and it is the one people skip.
On the site's row, click Preview - the icon at the end of the Actions column, after Edit, Archive and Restore. It counts how many files the current policy would archive and changes nothing. If that number is zero, your policy is not matching anything and you should go back to Step 2 rather than start loosening things at random. If the number is far larger than you expected, you have learned that before archiving rather than after.
The Archive button is not the same thing. The Archive action on a site archives every live file in the site, ignoring your age thresholds entirely. It is the full-site archive tool - see full site archive. It follows the same rule as every other manual action: it archives what you pointed it at, not what your policy would have chosen. If you want threshold-respecting behaviour, that is Preview plus the scheduled run, not the Archive button.
How you know it worked: Preview returns a sensible, non-zero count, and nothing has changed in SharePoint. Step 12 is where you check that the scheduled run then did what Preview said it would.
Step 6: Deploy the Archive and Restore buttons
The buttons put Archive and Restore into the SharePoint document library toolbar, so users can act on files without leaving SharePoint. It is also the part your users will actually touch, so it is worth having in place before you involve anyone else.
Go to Settings → Button Deployment. On the Deployment tab:
- Turn on Enable Button Deployment.
- Choose a scope. Deploy buttons only to Archive-enabled Sites is the right choice for a proof of concept - it keeps the buttons on your test site rather than putting them across the whole tenant.
- Add any sites you want skipped to the exclusion list.
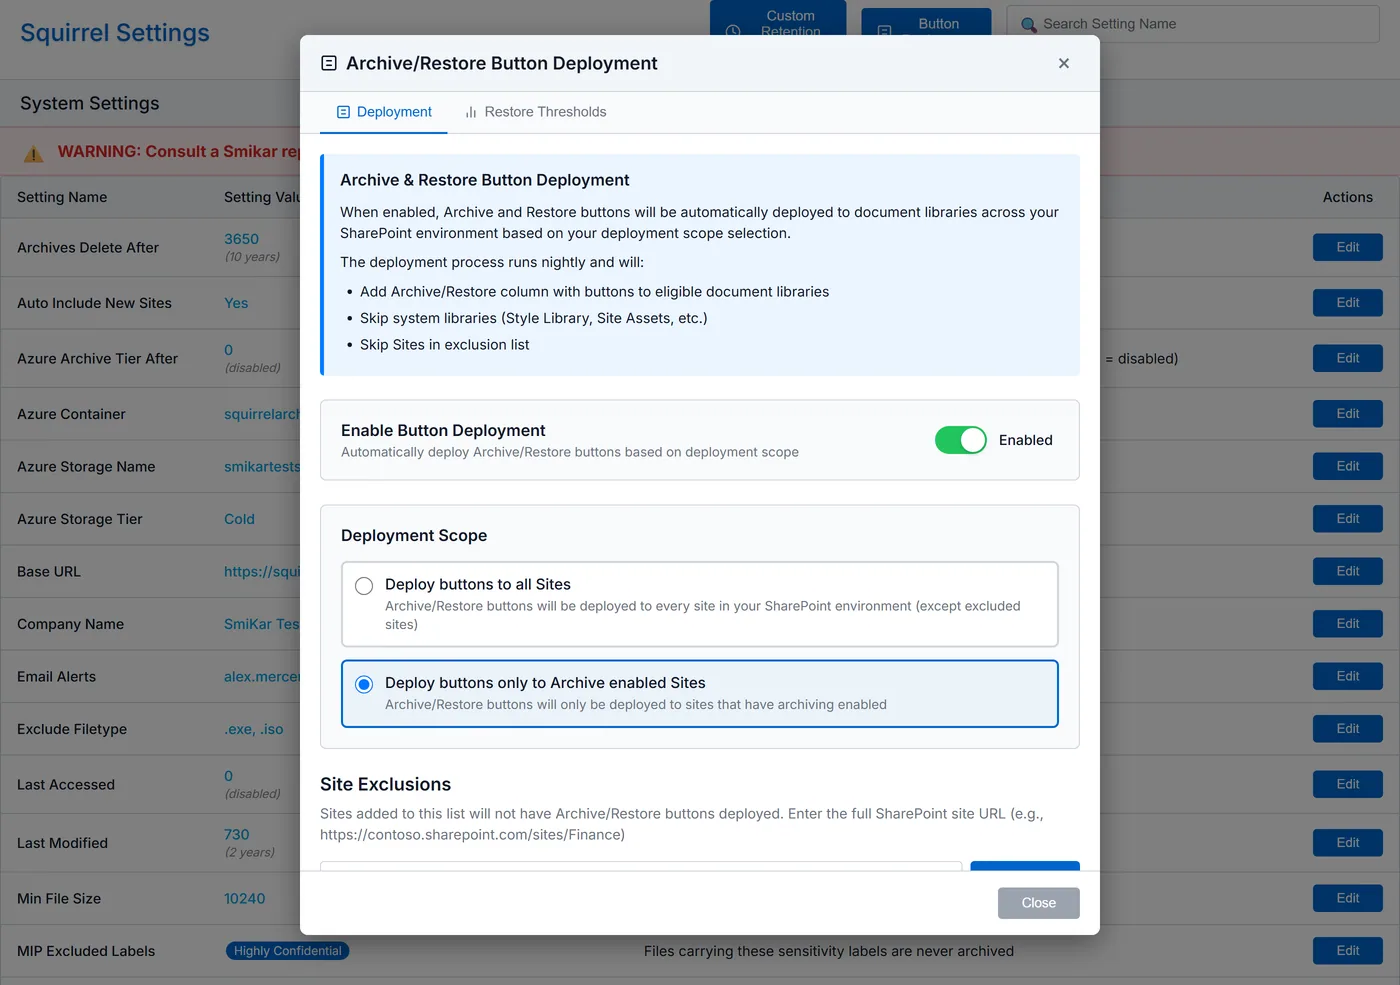
It is all done from the portal. There are no packages to upload and no scripts to run. See archive and restore buttons.
Deployment runs at midnight, local time - the same schedule as the archiving run. Turning the toggle on does not put buttons in SharePoint that instant.
This catches people out in the order this guide is written. A site you enable in Step 3 does not get its buttons until the next midnight, so if you reach Step 7 on the same day, the Archive button will not be in SharePoint yet. That is not a fault and nothing is wrong with the deployment - it simply has not run.
You have two options, and neither costs you anything:
- Do Step 7 from the portal today, which needs no buttons at all, and come back tomorrow for the SharePoint route.
- Or stop here for the day. Tomorrow morning you will have the buttons and the first scheduled archiving run behind you, which is Step 12 done at the same time.
While you are here, look at the Restore Thresholds tab. It sets the point at which a large restore warns the user, demands explicit confirmation, or is blocked outright. Worth knowing before somebody in the proof of concept selects a folder of 10,000 files and hits Restore. See restore confirmation thresholds.
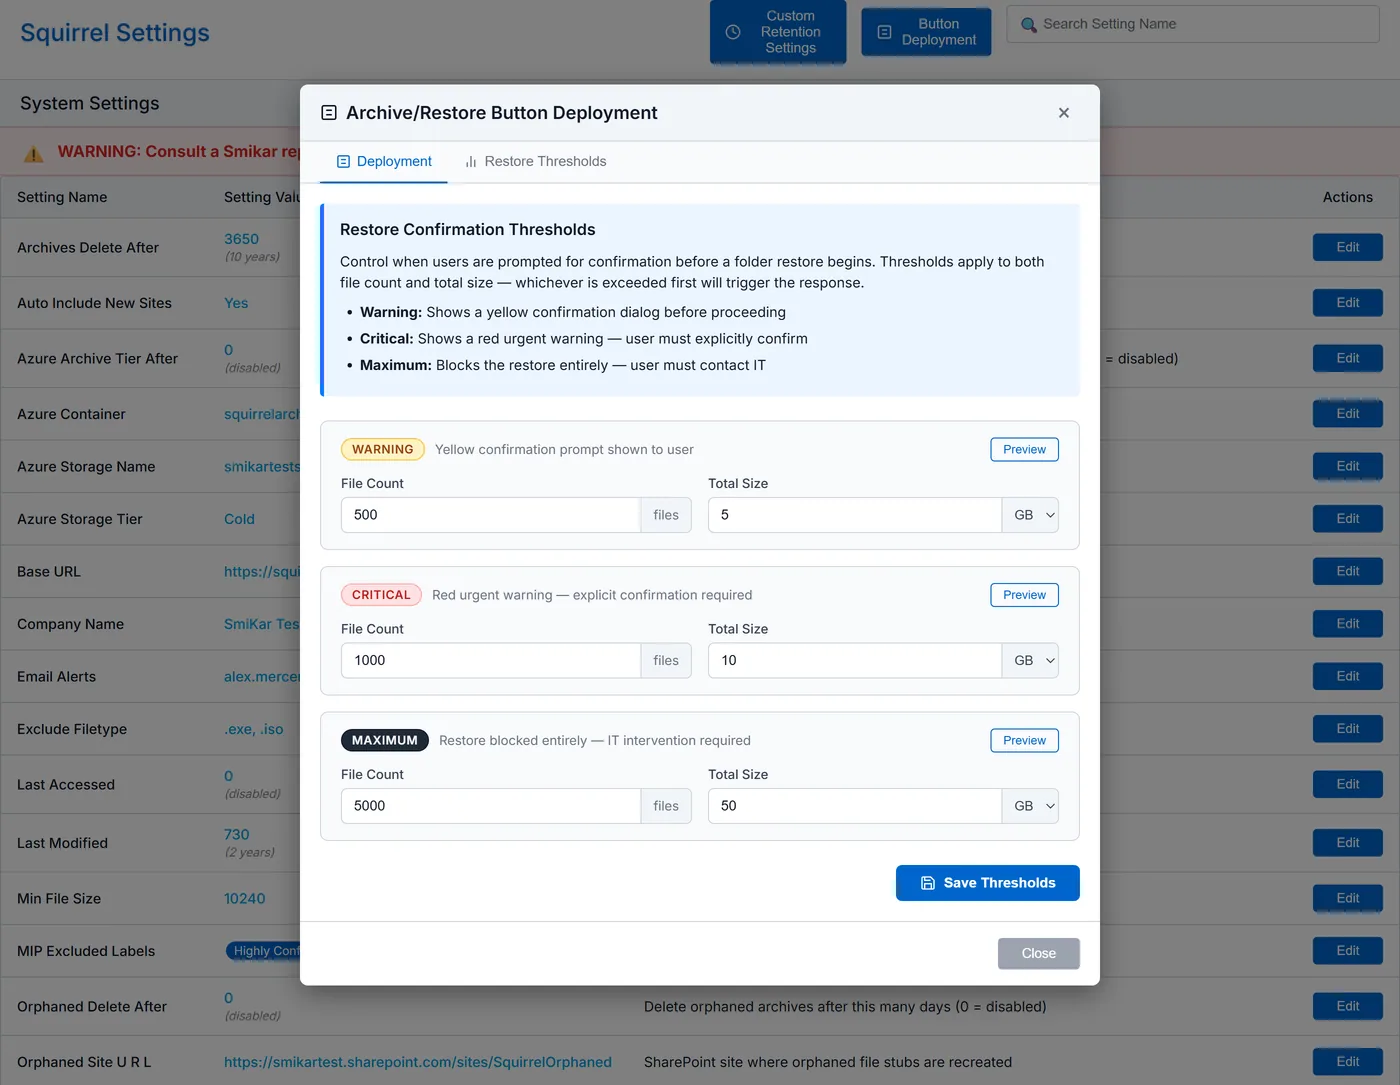
How you know it worked: the next day, open the test site's document library - Archive and Restore appear in the toolbar.
Step 7: Archive a file manually
Now prove the round trip. You have two ways to do this, and it is worth doing both.
A manual archive ignores your policy entirely. It archives what you selected, whatever its age or size, and whatever your thresholds and exclusions say. So you do not need a file that matches your policy for this step - any file will do, including one you created a minute ago. That is what makes it the quickest way to see the whole cycle work.
From SharePoint, as a user would. Open the test library, select any file, and click Archive. This is the end-user experience - see archiving a file.
If the Archive button is not there, the deployment run has not happened yet - see Step 6. Use the portal route below today and come back to this one tomorrow.

From the portal, as an administrator would. Use search to find a specific file and archive it on demand, or archive and restore by path to act on a whole folder. Both are manual, so both ignore the policy in the same way. Archive by path is the clearer one to watch, because it reports Total Items, Archived Items and Non-Archived Items for the path before you commit to anything.

How you know it worked: the file is gone from the library and a stub has appeared in its place - same filename, with .html on the end. The file also appears in Archived Files in the portal.
Step 8: Look at what the user sees
Spend a minute here, because this is the part that decides whether people accept the product.
Open the stub. It carries the original filename, keeps the file's metadata and dates, and holds a link that restores the original. It is a few kilobytes rather than the size of the real file. See stub files.
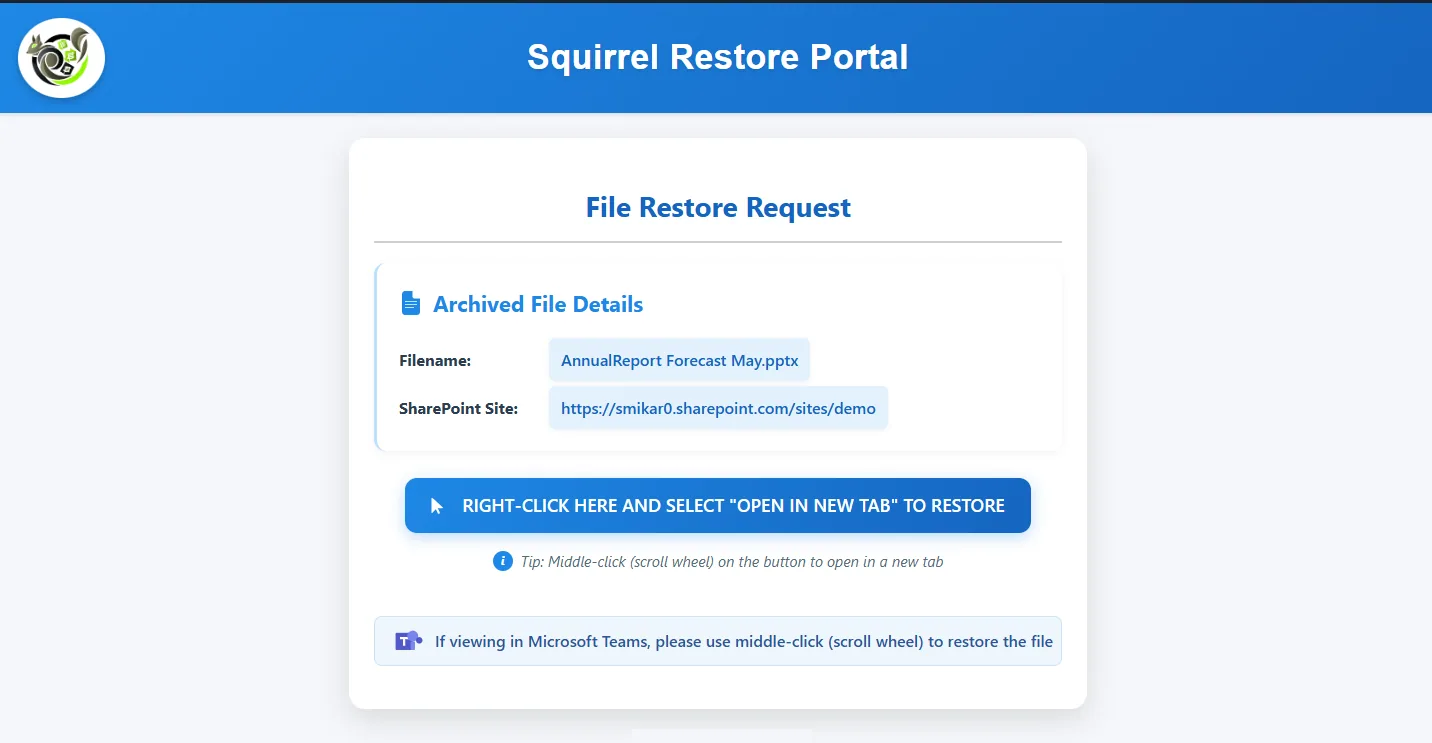
Stubs appear in SharePoint on the web, in Teams, and in OneDrive-synced folders on Windows and Mac. They do not appear inside Office Online or the Office desktop applications, so do not demonstrate this by looking for the file from inside Word.
Search: test this one deliberately
Sooner or later somebody will search SharePoint for a phrase they know is inside an archived document. It is worth knowing what happens before they do.
The stub keeps the original file's name, owner and dates in SharePoint search, so searching by filename still finds it. But the stub's content is the restore page, so full-text search no longer matches words from inside the document. That is inherent to archiving the file out of SharePoint, not a defect.
Nutshell AI is the answer to it. The summary type is set per tenant on the AI Processing Settings page - there are five to choose from, trading depth against processing cost, and it is worth picking one deliberately before you judge the output. It writes an AI summary of the document into the stub, which puts the document's actual subject matter back into SharePoint search and back within reach of Microsoft 365 Copilot - while the file itself stays archived. If discoverability matters to you, run the search test twice: once against a stub without a summary and once against one with. That comparison is the clearest way to judge whether Nutshell is worth having.
How you know it worked: you can describe, from the user's point of view, what changed and what did not - including what happens when they search.
Step 9: Restore the file
Again, both ways.
As a user. Click the stub, then the restore link on the page that opens. It shows progress while the file is retrieved, decrypted and written back. See restoring a file and the restore process.
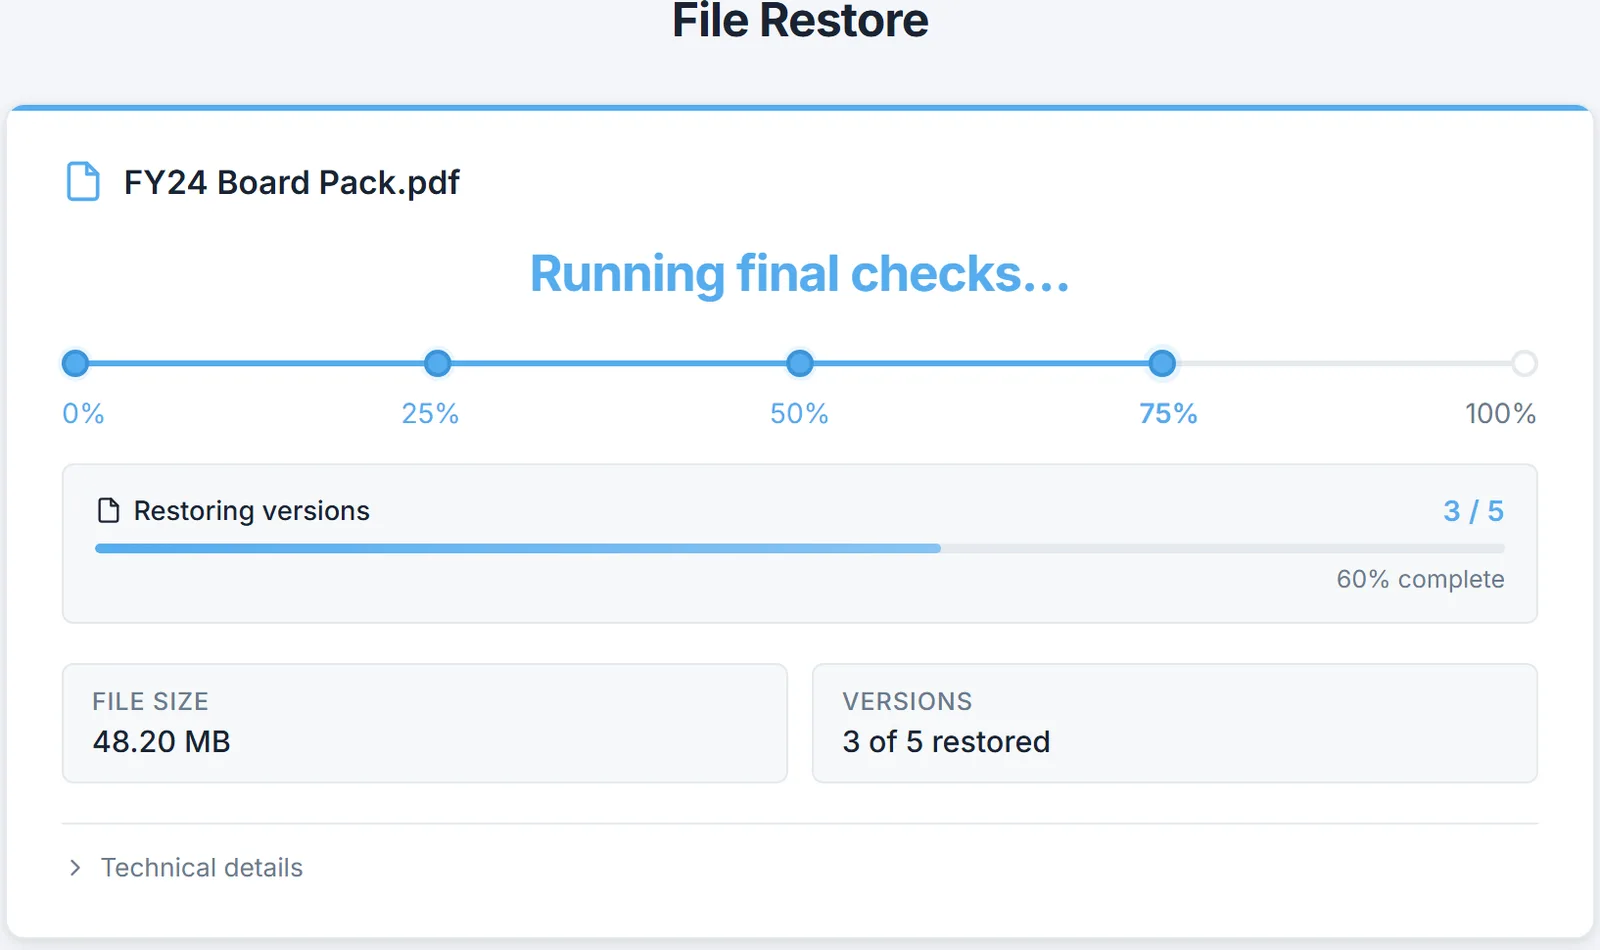
As an administrator. Find the file in Archived Files and click Restore. You can restore it in place, or to a different site and folder entirely - which is the option to show if anyone asks what happens when the original location is gone.
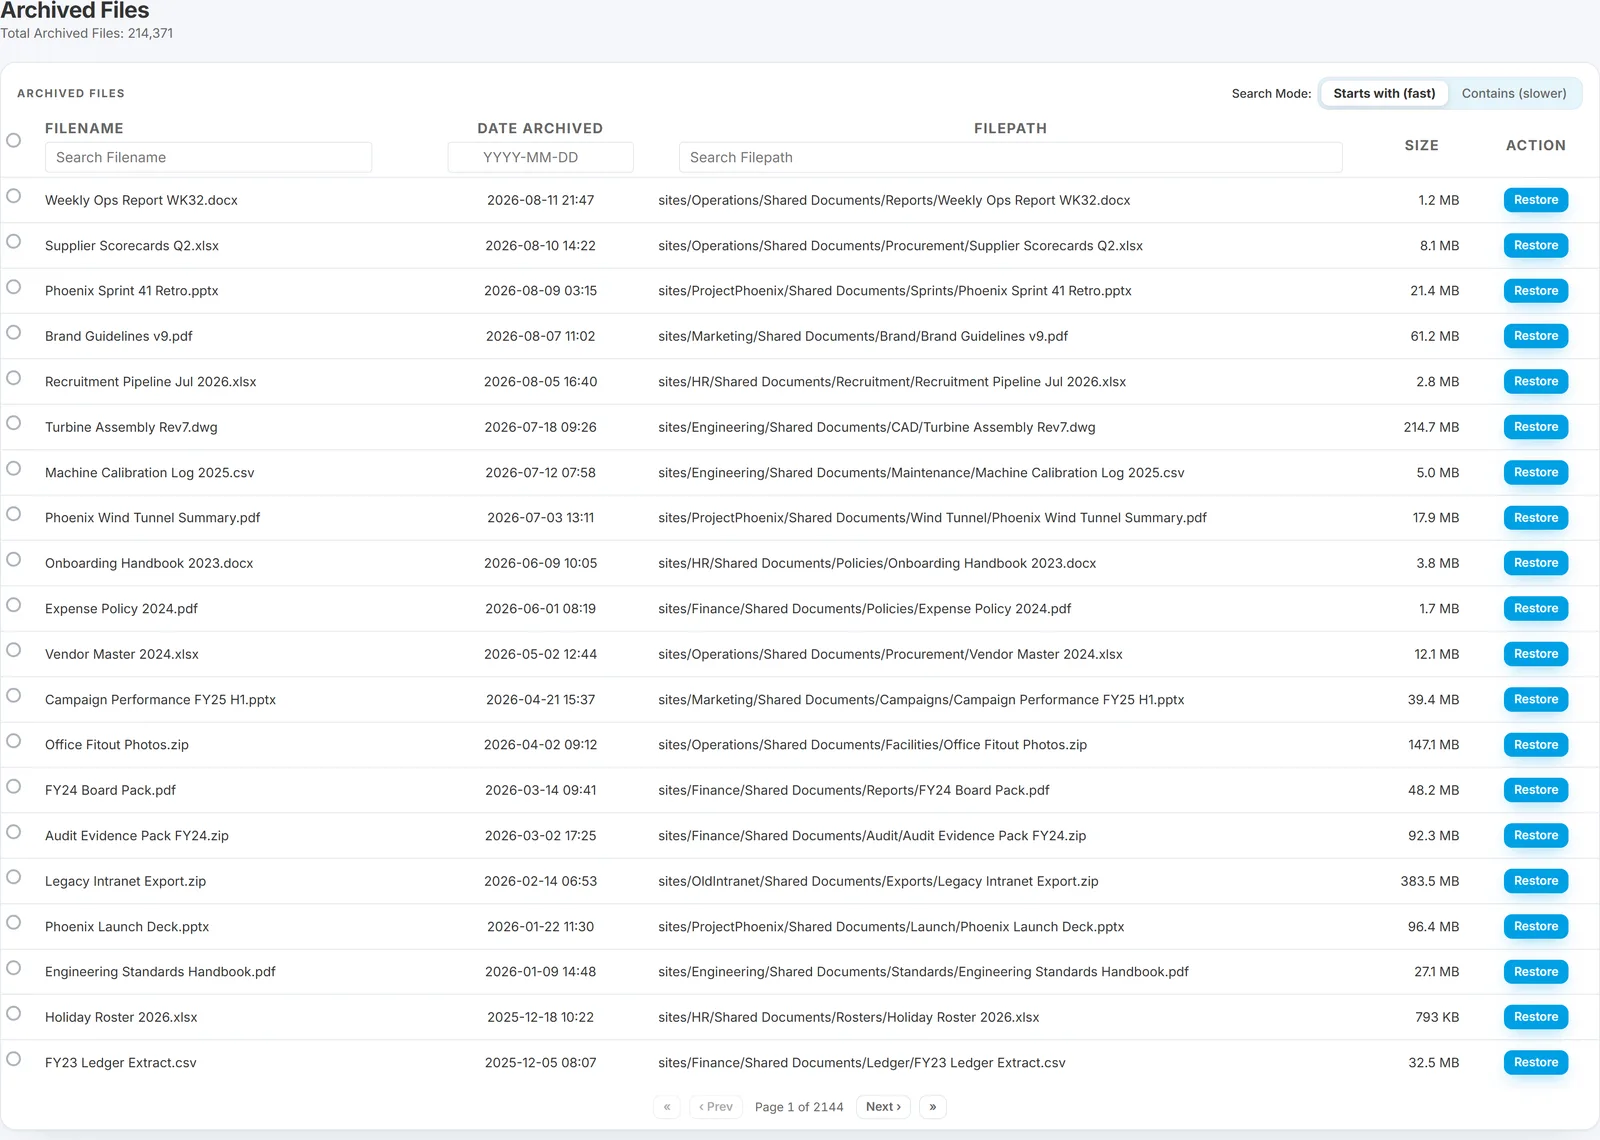
Do one restore to a different location as well, not just in place. It is the path you would use when the original site has been decommissioned, and it is better to have tried it once than to work it out during an incident.
How you know it worked: the file is back in its original location, and its version history is intact. Open the version history and check - restoring with the full version chain preserved is a specific claim worth proving rather than asserting.
Step 10: Archive and restore a whole folder
Select a folder in the document library - one click to select, do not open it - and use the Squirrel Archive or Squirrel Restore button. Every file inside is actioned in one go.
This is how you would actually work through a backlog of old content, so it is worth testing rather than assuming.
How you know it worked: the folder's contents are stubs, and a folder-level restore brings them all back.
Step 11: Archive and restore the whole site
The last scope. On the site's row in Site Archive Settings, the Archive and Restore buttons act on everything in the site at once. Leave this until your threshold tests are finished, because a site-wide archive takes the lot.
Archiving the whole site
Clicking Archive on the site row asks you to confirm, and the wording is deliberately blunt:
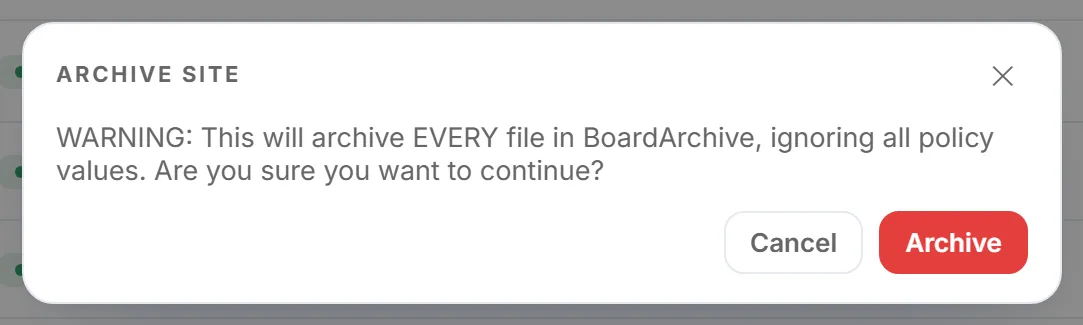
It ignores your age thresholds. Every live file in the site is queued regardless of when it was last modified or accessed, including files people are working on today. That is the difference between this button and the nightly policy run, and it is why Step 5 uses Preview to test a policy instead.
Used deliberately, it is the right tool for a decommissioned site or a department that has moved on. Watch it run in the Activity Monitor. See full site archive.
How you know it worked: the site's libraries are stubs, and the site's SharePoint storage has dropped sharply.
Restoring the whole site
Restore on the same row brings every archived file in the site back. The confirmation is more informative than the archive one, and it is worth reading rather than clicking through:
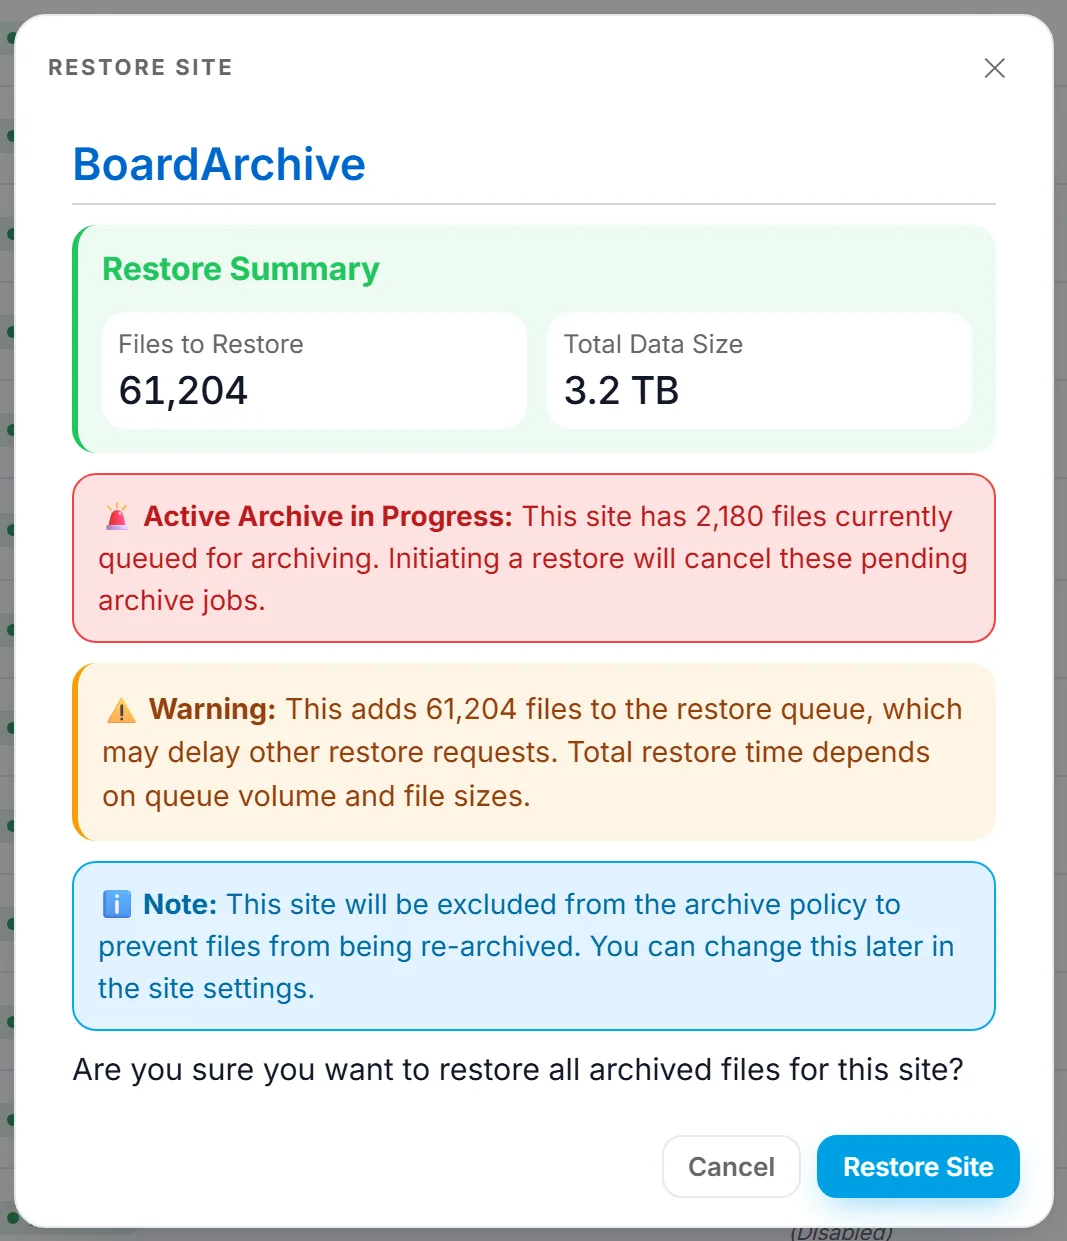
Three things it tells you:
- Files to restore and total data size, before you commit. This is your sanity check that you are restoring what you think you are.
- Whether an archive is still in progress. If the site has files queued for archiving, starting a restore cancels those pending archive jobs. Useful to know if you have just kicked off an archive and changed your mind.
- That the site will be excluded from the archive policy. This is the one that surprises people. Squirrel excludes the site so the files you just restored are not immediately re-archived by the next policy run. It is the behaviour you want after a cleanup - but it does mean the site stops archiving until you set it back to Included in site settings.
See full site restore, which also covers restoring into a different site where the original has been deleted.
How you know it worked: the stubs are replaced by real files, and the site shows as Excluded in the site list - which is expected, not a fault.
Step 12: Let the scheduled run do it on its own
Everything so far you did by hand. This step is the one that tests the product rather than your clicking, and it is the only one that needs you to wait.
Squirrel archives on a schedule, normally overnight. Settings you change take effect on the next cycle, so the sequence is: set the policy, run Preview to see what it predicts, then come back the following day and check what actually happened.
- Confirm the site is Included and your thresholds are set (Steps 3 and 4).
- Run Preview and write the number down. This is your prediction.
- Leave it. Do not archive anything by hand on that site in the meantime, or you will not be able to tell which files went which way.
- The next day, open Archived Files and filter to the site.
How you know it worked: files were archived without anybody pressing anything, and the count is in the region Preview predicted. Spot-check a few against your thresholds - they should all be older than the age you set, and none should be under your minimum file size.
If nothing happened at all, work back through the eligibility list in Step 2. In practice it is almost always the default Last Modified of 730 days, a site still set to Excluded, or files under 10 KB.
Allow a full cycle before concluding anything is wrong. SharePoint change processing can lag by 24 to 48 hours, so a policy change made this morning may not show its full effect until the day after next. See limitations.
Test an exclusion while you are here
Exclusions only apply to the scheduled run, so this is the step to test them in - a manual archive ignores them entirely.
Before the run, exclude one library or folder on the test site using excluded libraries and paths. The next day, confirm that everything else archived and that library did not.
It is worth doing deliberately. "Which folders will you leave alone?" is one of the first questions a records or legal team asks, and an exclusion you have watched work is a better answer than one you have read about.
Worth adding to the proof of concept
Beyond the core round trip, these are the things worth testing before you commit:
-
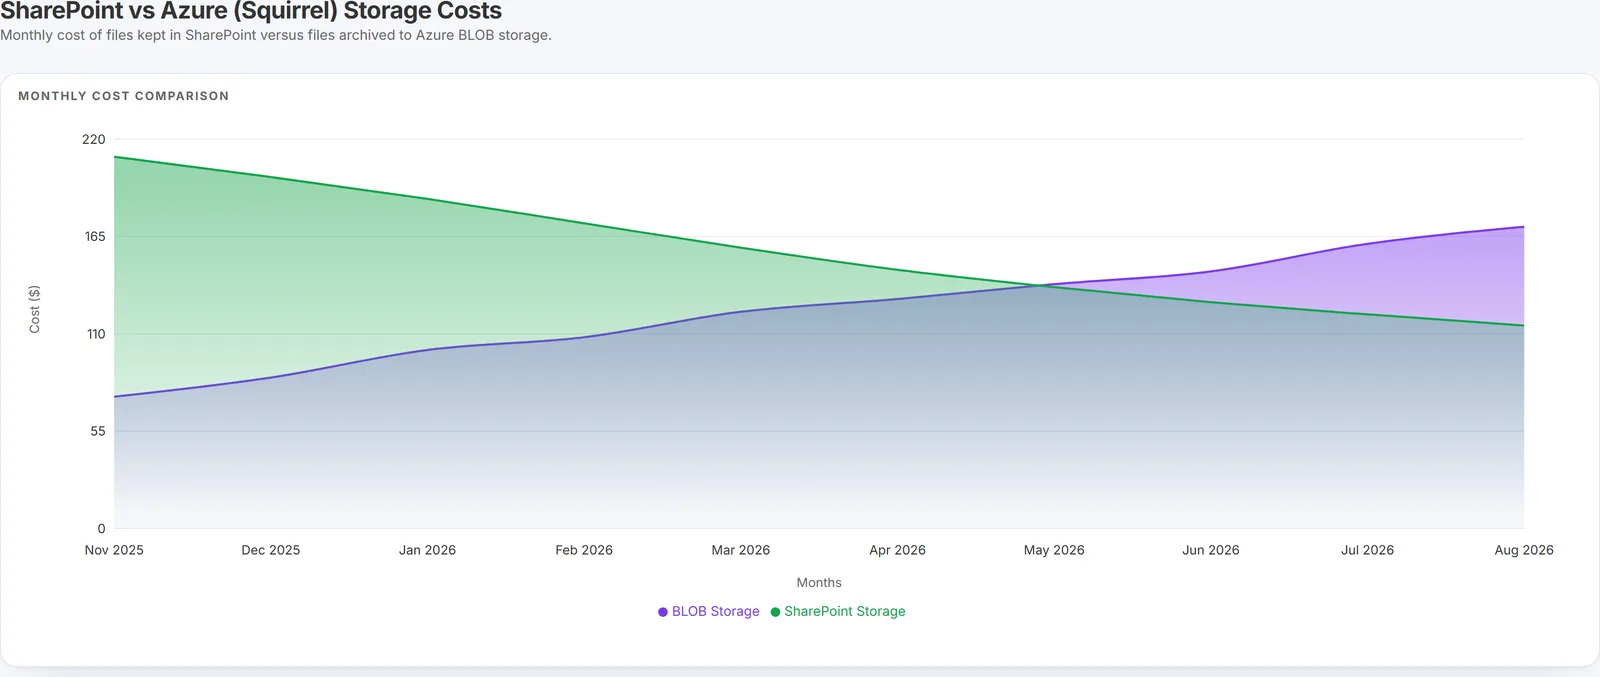
The cost chart. Analytics -> Costs plots what your files cost in SharePoint against what they cost archived, over the billing timeline. The point where the lines cross is the month archiving started paying for itself. This is the figure to take into a budget conversation, and it is grounded in your own storage rather than a general estimate.
-
The dormant-site evidence. The Site Activity activity score - "2% of this site's files have been touched in 30 days" - gives you a defensible basis for a policy threshold rather than an opinion about which sites are quiet.
-
File History. One search that answers "where did this file go?" across archive, recycle bin, orphans and restores. Worth trying, because it is the question your service desk will end up fielding.
-
Recycle Bin capture. Captures deleted files out of the SharePoint recycle bin before Microsoft's own expiry removes them for good. If retention or accidental deletion is part of why you are evaluating, include this.
-
Burrow. The security and audit layer, if you also need to know who is doing what with the content rather than only where it is stored.
-
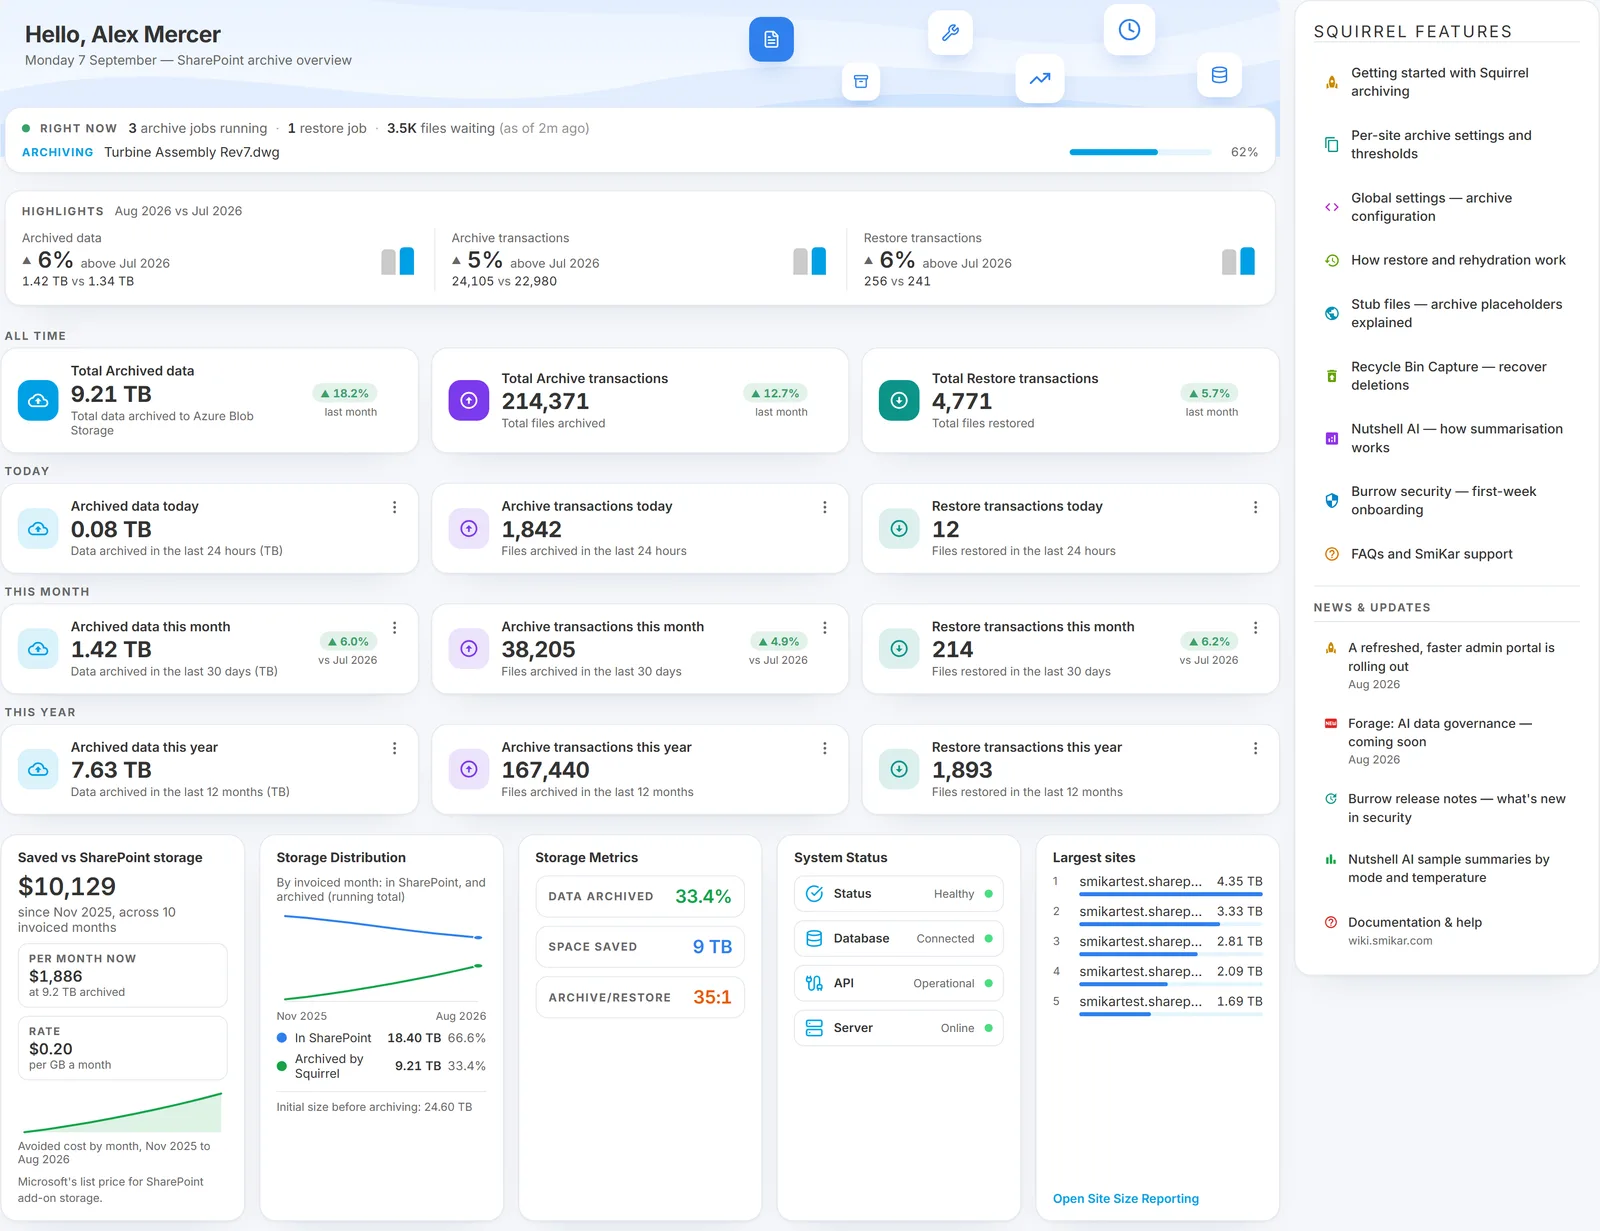
The archive overview. The dashboard is the single screen that summarises the whole picture - archived totals, storage saved, and recent activity.
-
The audit trail. If you need to account for who archived or restored what, and when, History records every archive and restore action, and the log viewer holds the detail behind a specific job. Check that it covers what your auditors would ask for.
-
A labelled file being skipped. If sensitivity labels matter to your organisation, put a label in MIP Excluded Labels and confirm a file carrying that label is left alone while its neighbours archive. That proves the exclusion works against your own labels rather than taking it on trust.
-
What happens when a site is deleted. Set Orphaned Site URL in global settings first - it is the SharePoint site orphaned content is recovered into, and the test does not work without it. Then archive a file, delete its site, and restore. The file goes to that location rather than being lost - see orphaned files. That settles the "what if we lose the site" case without having to ask anyone.
-
Reports. Reports produce downloadable CSVs, including per-site figures usable for chargeback. Useful if the result needs to go to people who were not involved in the test.
-
How long archives are kept, and what deletes them. Retention settings sets how long archived content lives in Azure before it is deleted, and it can differ per sensitivity label - so "keep contracts for seven years, clear scratch content after one" is expressed there rather than in the archiving policy. The tenant-wide default is Archives Delete After in global settings. Records teams will want to see this, and it is the setting with the most permanent consequences, so agree it before you widen the rollout.
-
The restricted admin role. Add a second administrator as an archive administrator and sign in as them. They can run archive and restore and review what is archived, but cannot change policy or settings - see console access and roles. If your service desk will do day-to-day recovery, this is the role they get, and it is worth confirming the boundary rather than assuming it.
-
Which storage tier you are on. Azure Storage Tier in global settings is what the cost chart is actually measuring. Cool and cold cost less to store and more to read; the Azure Archive tier is cheaper again but adds a rehydration wait of up to 24 hours on every restore. Decide this before you judge the savings figure, because it moves it.
Things that catch people out
| What happens | Why |
|---|---|
| Nothing archives at all | The default Last Modified is 730 days. Fresh test files are not eligible. |
| A small test file is ignored | Min File Size defaults to 10 KB. |
| A whole site archives when you expected the policy to apply | The site-row Archive button ignores age thresholds by design. Use Preview to test a policy. |
| A file you archived by hand was archived even though it does not meet the policy | Working as intended. Manual archiving - the SharePoint button, on-demand from the portal, a folder, a site - ignores thresholds, minimum size and exclusions. Only the scheduled run consults them. |
| The buttons do not appear in SharePoint | Deployment runs at midnight, local time. A site enabled today gets its buttons tomorrow morning, so they will not be there the same afternoon you enable it. |
| A policy change seems to have had no effect | Archiving runs on a schedule, and SharePoint change processing should be given 24 to 48 hours. See limitations. |
| A file's sharing links stop working after archiving | Archiving releases the file's existing shares. The stub does not carry them. |
| A OneNote notebook or SharePoint page is not archived | Squirrel covers document library content only. |
| A restore is blocked | It exceeded a restore confirmation threshold. |
| A restore takes hours instead of seconds | Azure Archive Tier After has been enabled. Files moved to the Azure Archive tier must be rehydrated by Microsoft first, which can take up to 24 hours. Leave this at 0 while you are testing, or a restore will not finish while you are watching it. |
| Searching for text inside an archived document finds nothing | Expected - the stub's content is the restore page. Nutshell AI's summary is what puts the subject matter back into search. |
Things worth checking before you decide
Where does our data actually go? Into your own Azure storage account, not SmiKar's. The storage account and container are named in global settings. Open that page and check the values against your own data-residency requirements.
Is it encrypted? Content is encrypted and compressed on the way into your storage. One practical consequence: the archive is not a set of loose files you can browse in the container, so restores go through Squirrel rather than straight out of Azure.
Who can restore a file? Anyone with access to the library the stub sits in, because the stub inherits permissions from its parent library. That includes external guests who already have access to that library. Worth checking against how your own libraries are shared.
What happens if we stop using Squirrel? You bulk restore the content back into SharePoint before the agreement ends. Stubs do not keep working on their own once the service is gone, so an exit is something to schedule rather than something that just happens. See full site restore.
How long does a real archive run take? Watch the Activity Monitor during your test run. It shows each file with its size and progress, which will tell you more about your own content than a general figure would.
Does it work in Teams and OneDrive? Stubs appear and restore in both. Open the same library through Teams and through a synced folder to confirm it for yourself.
Finishing the proof of concept
If you are going ahead, nothing needs undoing - widen the policy and include more sites when you are ready.
If you are not going ahead, or you want the test site returned to exactly how it was, restore the content before the evaluation ends using the site-wide Restore in Step 11. Do it while the environment is still in place rather than afterwards.
Remember that a full-site restore also sets the site to Excluded. If you are going ahead and want that site to keep archiving, set it back to Included afterwards.
Checklist
- Squirrel administrator access, and the portal URL
- A test site chosen with genuinely old content in it
- Global policy set to something your test content can satisfy
- Test files confirmed larger than the minimum file size
- Test site set to Included
- Per-site Accessed Days / Modified Days set
- Preview run, returning a sensible non-zero count
- Button deployment enabled, and buttons confirmed in SharePoint the next day
- A file archived by hand from SharePoint, and one from the portal (any file - manual archiving ignores the policy)
- Stub inspected - filename, metadata, size, and the AI summary if Nutshell is in scope
- File restored, and version history confirmed intact
- A folder archived and restored in one action
- A whole site archived and restored from the site row, with the confirmation dialogs read rather than clicked through
- The scheduled run left to archive on its own overnight, and the result checked against the Preview count
- An excluded library confirmed skipped by that run
- One restore done to a different location, not just in place
- Retention and deletion behaviour agreed before widening the rollout
- Storage tier chosen, and understood to be what the cost figures reflect
- Cost chart and site activity figures captured for your own write-up
- Plan agreed for what happens to the archived test content
See also
- Getting started - what Squirrel is, in brief.
- Admin guides - the full administrator documentation.
- End user guides - what to hand to the people whose files these are.
- Limitations - constraints worth knowing before you design a rollout.
Need help with an evaluation? support@smikar.com.