
Configuring Burrow for Your Environment
8 min read · Last updated · Page version 9
This page is about environment setup - the handful of things only your organisation knows: which email domains are yours, which sites are sensitive, and who should hear about what. Get these right and Burrow is noticeably more accurate. Adjusting how sensitive detection is - detection posture, per-rule thresholds, and exceptions - is a separate, self-service job covered in the tuning guides and the rule catalog; Burrow runs the detection engine for you, but you're free to tune it.
Most of the environment settings below learn themselves - Burrow watches your tenant and proposes what it finds. Your job is mostly to confirm its suggestions and add anything it can't know. Spend about 20 minutes on this in your first week. Everything here is done in the dashboard; no technical knowledge required.
This page is the setup companion to the day-by-day first-week onboarding checklist.
1. Internal Domains - which email domains are yours
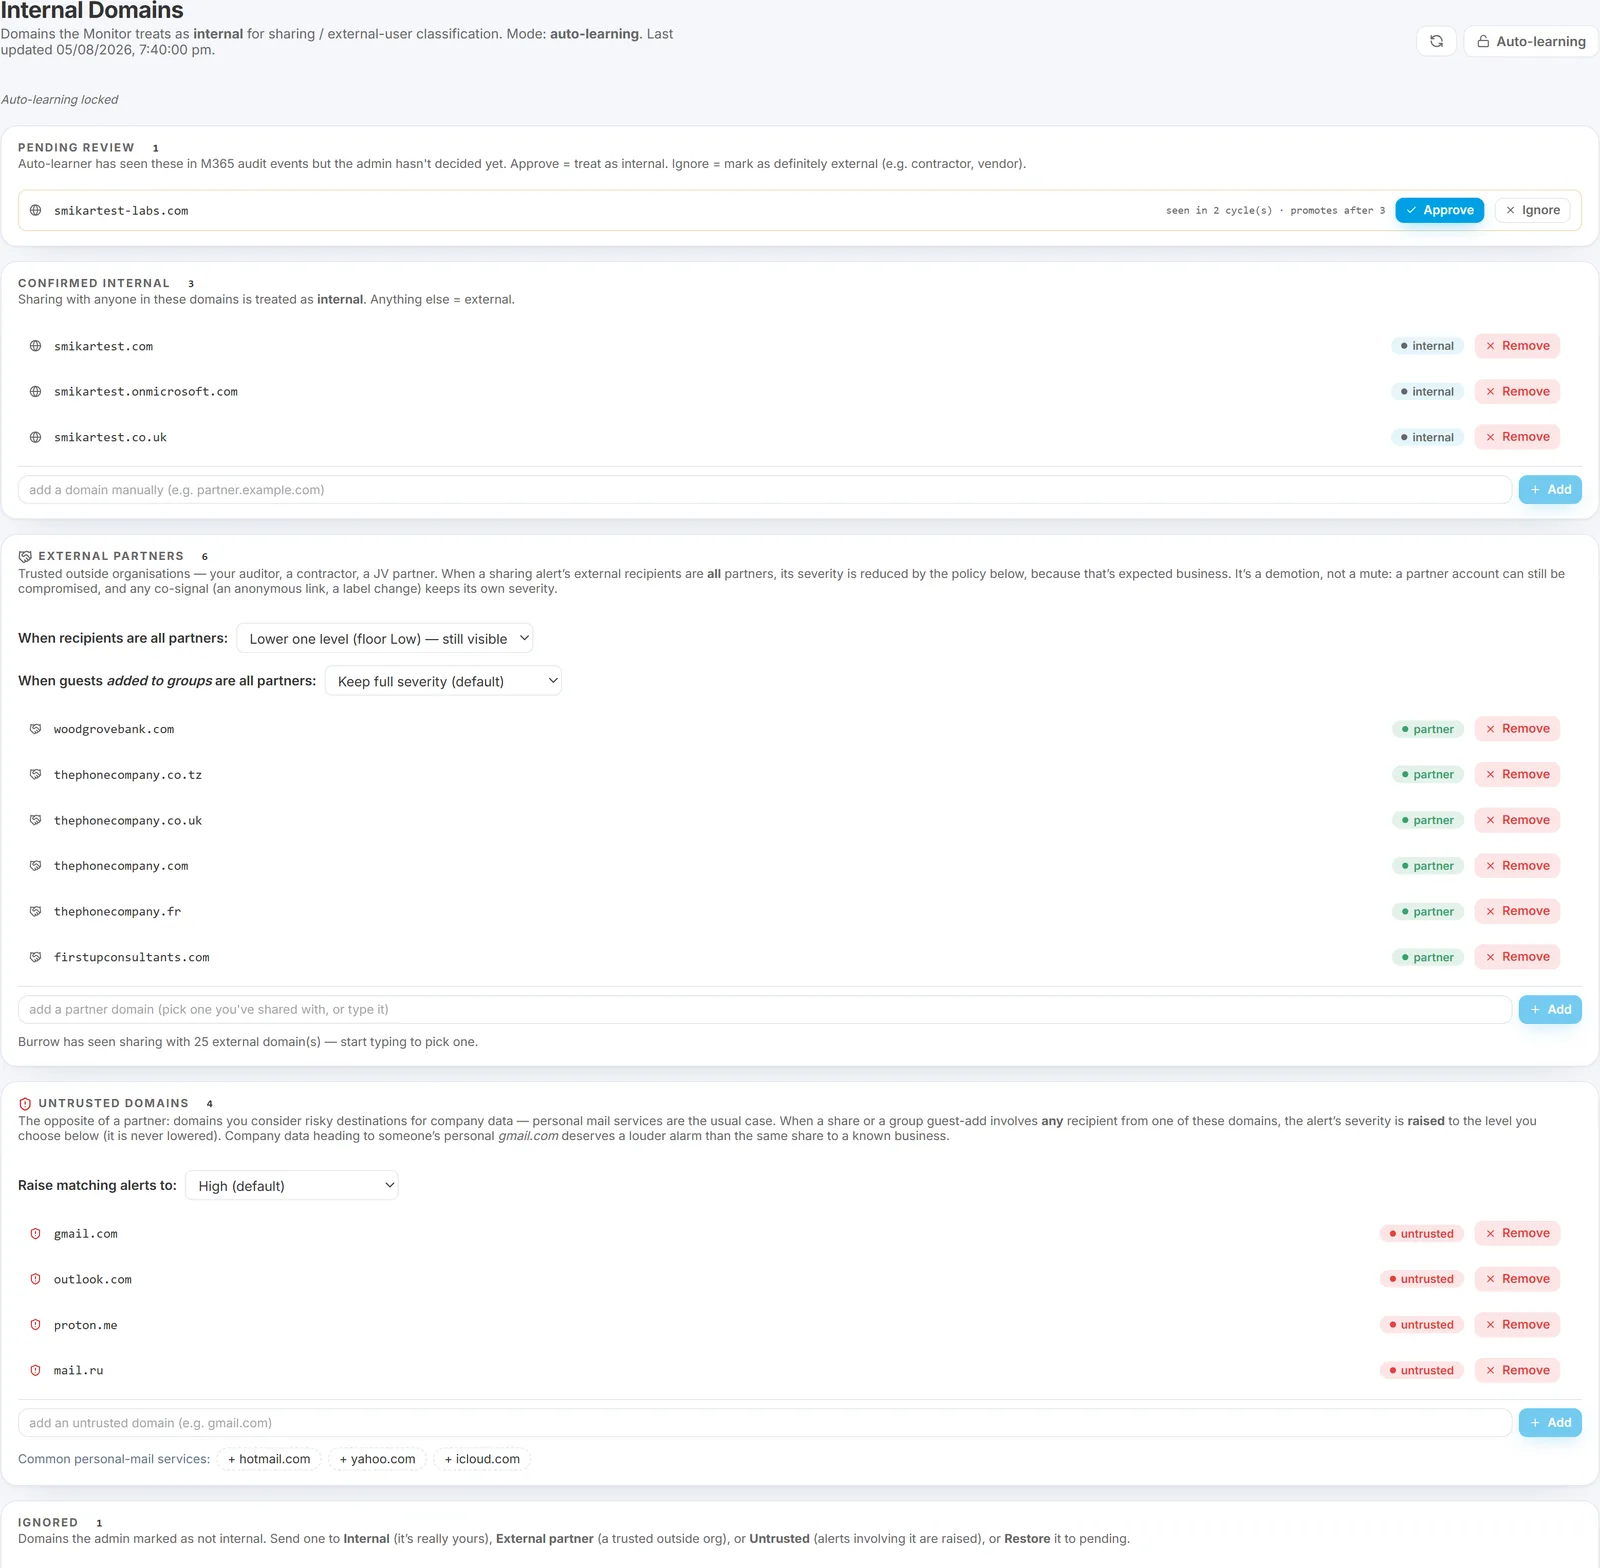
What it is: the list of email domains that belong to your organisation.
Why it matters: Burrow decides whether a file was shared externally (a potential leak) or internally (normal collaboration) by looking at the recipient's email domain. If the list is incomplete, a colleague at a subsidiary on a different domain looks like an outsider - false "external sharing" alerts. And if an outside domain is wrongly marked internal, real external sharing to it becomes invisible. This is the single highest-impact thing you can do for sharing-related accuracy.
Set it up:
- Go to Internal Domains in the left navigation.
- Burrow has already learned the domains it sees in active use - review the promoted list and confirm they are all really yours.
- Add any missing ones: every domain your organisation owns - primary domain, subsidiaries, acquired brands, regional variants, and vanity domains staff email from. Burrow may not have seen a rarely-used one yet.
- If the learner promoted something that isn't yours (a close partner you collaborate with heavily), exclude it so it is treated as external.
How to know it's right: open the External Sharing report - every recipient there should be a genuine outside party. If you see your own colleagues in that list, their domain is missing from Internal Domains.
Trusted partners: further down the same page is an External Partners list. These are outside organisations you share with routinely - your auditor, a contractor, a JV partner. They stay external (still recorded), but Burrow lowers the severity of a sharing alert when every recipient is a partner, so routine partner-sharing stops paging you as High. Add the ones you know about here.
See Internal domains for the full detail, including the External Partners policy options.
2. Sensitive Sites - your crown-jewel SharePoint sites
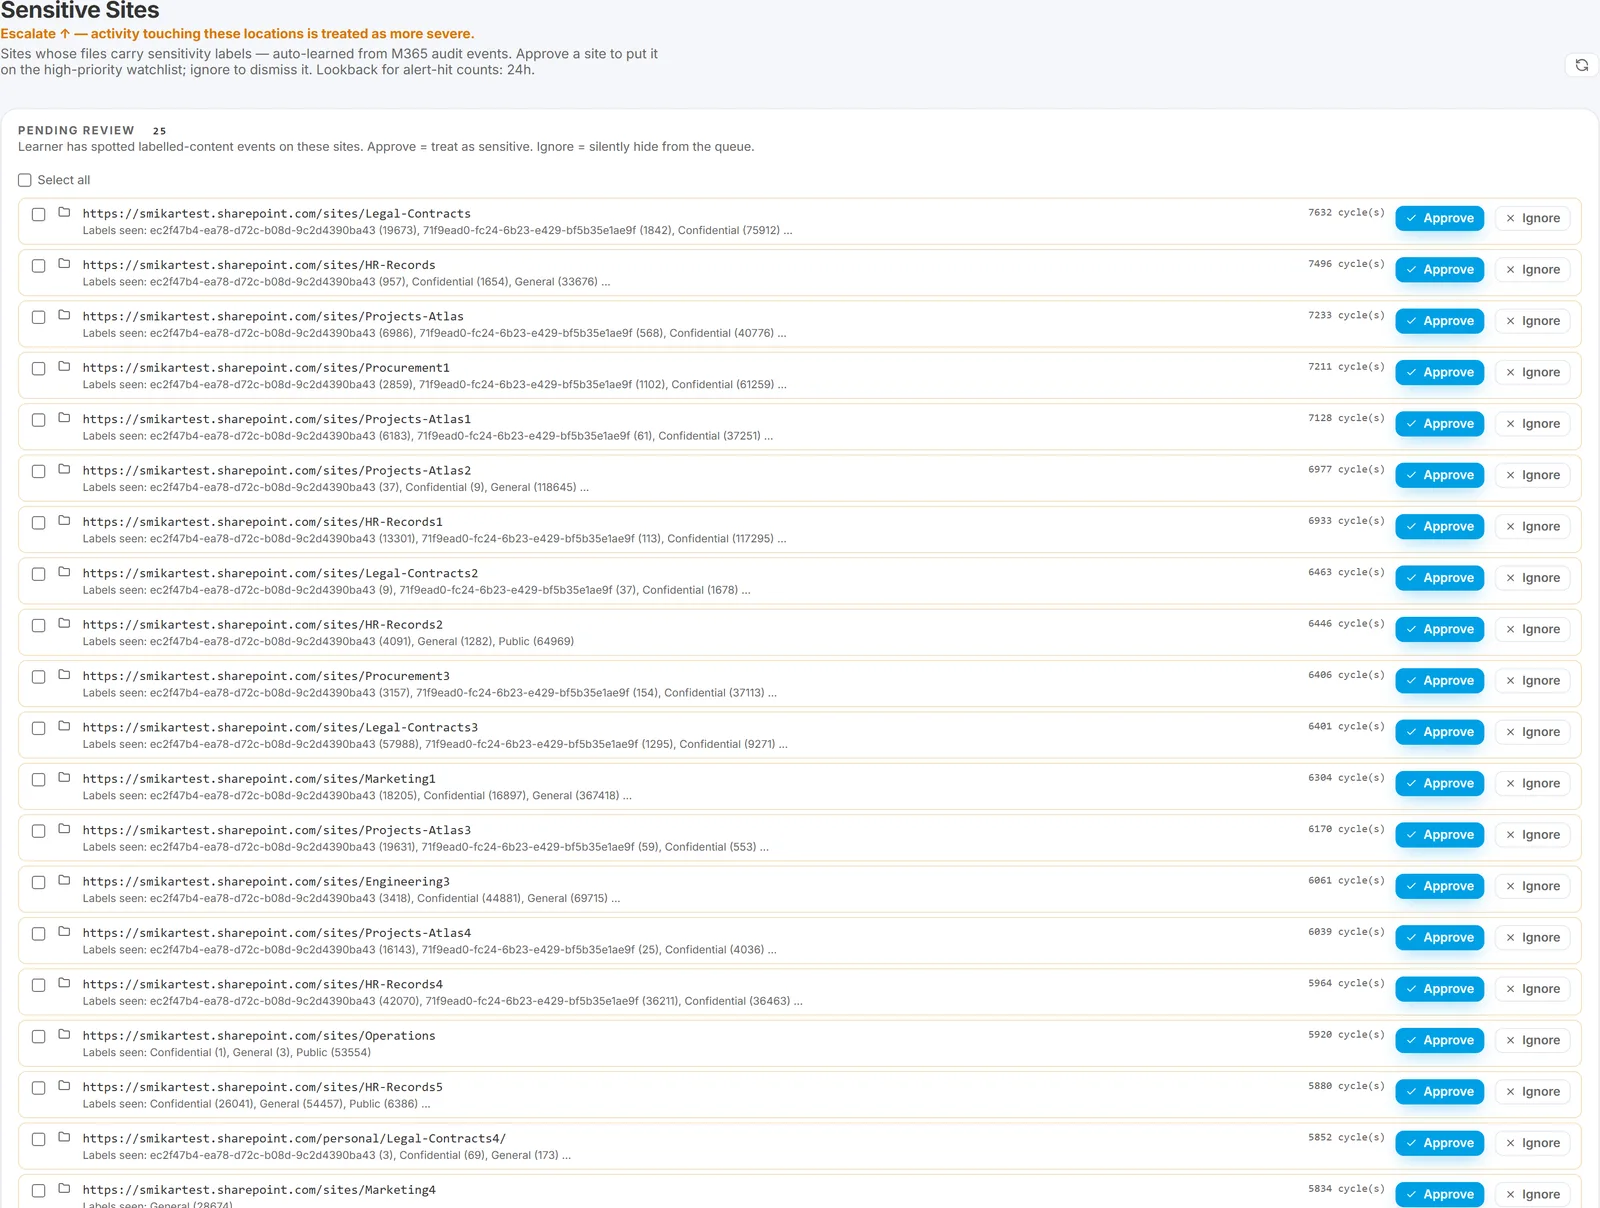
What it is: a list of SharePoint sites (or site-name patterns) holding your most sensitive content - finance, legal, HR, M&A, R&D, executive.
Why it matters: the same action carries different risk depending on where it happens. Someone bulk-downloading from the staff social site is nothing; the same from your M&A deal room is serious. Marking a site as sensitive tells Burrow to treat activity there as higher priority, so those alerts stand out and reach you sooner.
Set it up:
- Go to Sensitive Sites (in the Tuning menu).
- Burrow suggests sites automatically - it notices where sensitive content actually lives and proposes them. Review and Approve the ones that are genuinely sensitive.
- Add your own for any site you know is sensitive even if Burrow hasn't flagged it yet (a brand-new deal room, say). A pattern can cover a whole family of sites - anything under your Finance area, for example.
- If Burrow over-suggests a site that isn't actually sensitive, dismiss it so it stops proposing it.
How to know it's right: revisit weekly for the first month and clear the suggestion queue. Once it's quiet, your sensitive-site list reflects your real risk map.
See Sensitive sites, labels, and keywords.
3. Sensitive Labels - put your Microsoft labels to work
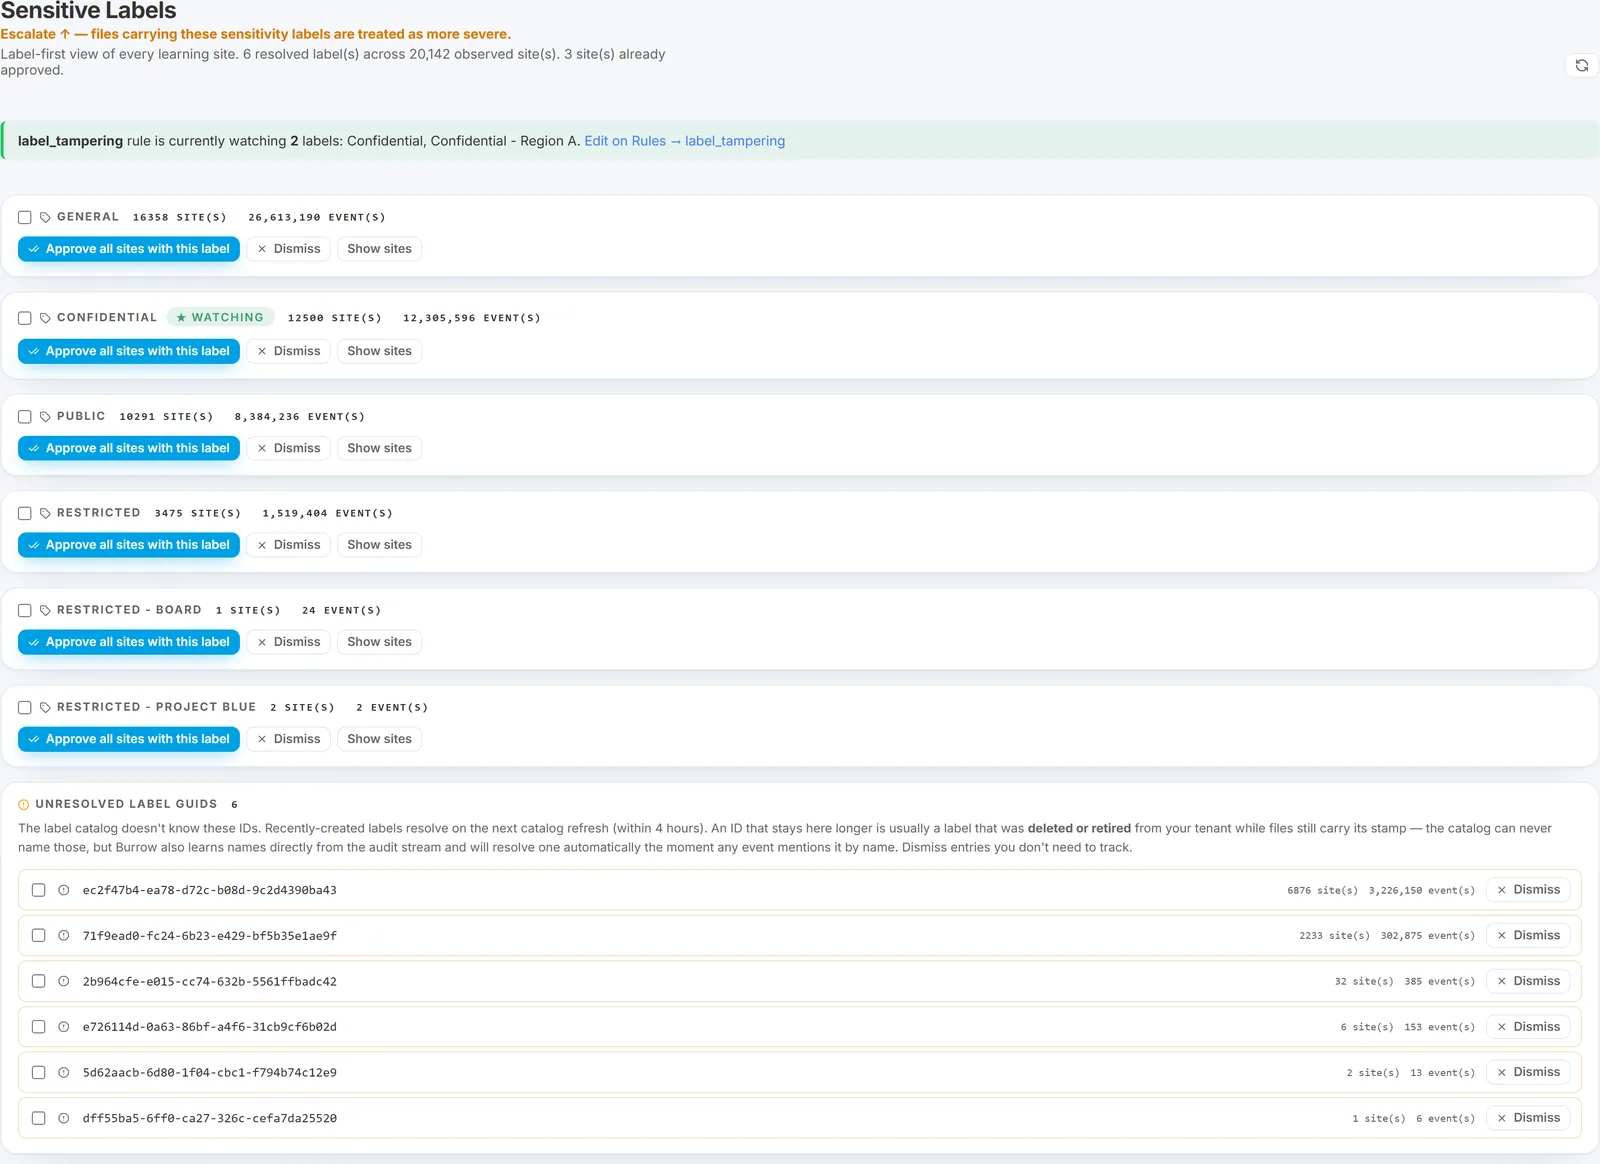
What it is: rules built on your Microsoft Purview / sensitivity labels (Confidential, Restricted, and so on) - telling Burrow what to watch for when a labelled file is involved.
Why it matters: your labels already encode what's sensitive. Burrow can act on them - for example, raise an alert when a Confidential file is downloaded from an unmanaged device, or a Restricted file is shared outside the company. This is often your most precise signal, because it's driven by classifications your business already made.
Set it up:
- Go to Sensitive Labels. Burrow shows every sensitivity label it has seen in your tenant (refresh to re-pull the latest from Microsoft 365).
- Create a rule for the labels that matter most. A rule reads like a sentence: "for label Restricted, when it's shared externally, raise a high alert."
- Start with one or two high-value rules (your top label plus your biggest worry) rather than covering everything - add more as you learn what's useful.
How to know it's right: when a labelled-file rule fires, the alert names the label and the file. If rules are firing on routine internal use, tighten the condition (only external sharing, not all sharing).
See Sensitive sites, labels, and keywords.
4. Notifications - who hears about what
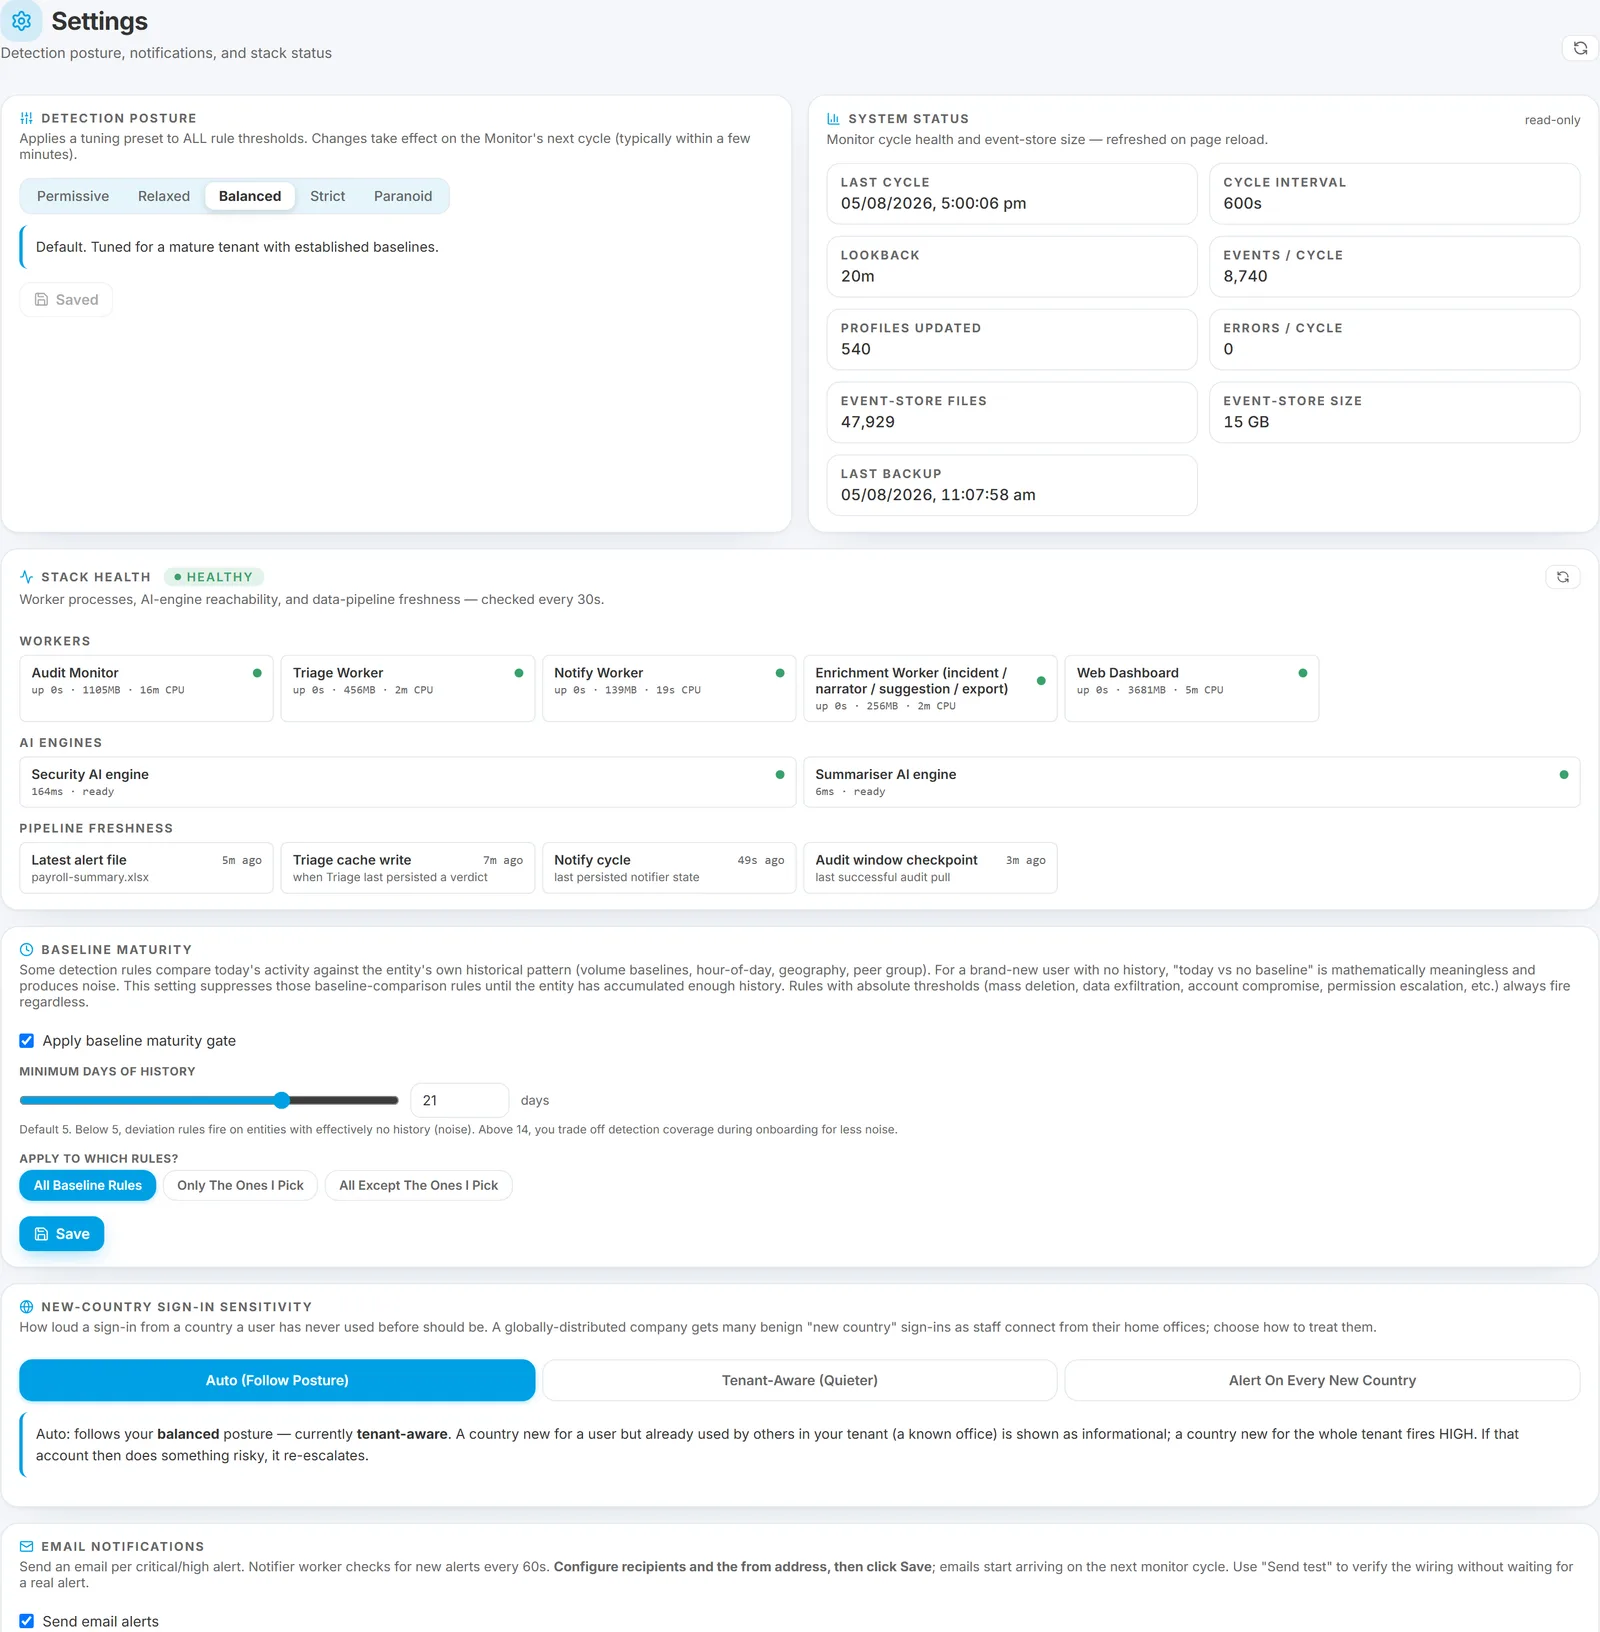
What it is: who receives alert emails, how noisy they are, and the weekly summary.
Why it matters: alerts are only useful if they reach the right people at the right threshold. Too low and the inbox becomes noise people ignore; too high and you miss things. This is where you set that balance for your team.
Set it up:
- Go to Settings and open the Email notifications card.
- Recipients - add the inbox(es) that should receive alerts. A shared security mailbox is better than one person.
- Minimum severity - the lowest level that emails you. Most teams start at High (only the serious stuff) and lower it to Medium once they've tuned out routine noise. Critical-only if you want the absolute minimum.
- Weekly briefing - turn on the weekly executive summary and it arrives automatically; forward it to management.
- From address / display name - set these so alerts arrive clearly branded and don't look like spam. Use Test send to confirm delivery (check the junk folder the first time).
How to know it's right: after a week, if the security inbox is getting alerts people actually action, you're set. If it's noisy, raise the minimum severity or quieten a noisy source - don't just start ignoring the inbox.
See Configuring alert email recipients.
5. Watchlist - extra eyes on one person, temporarily
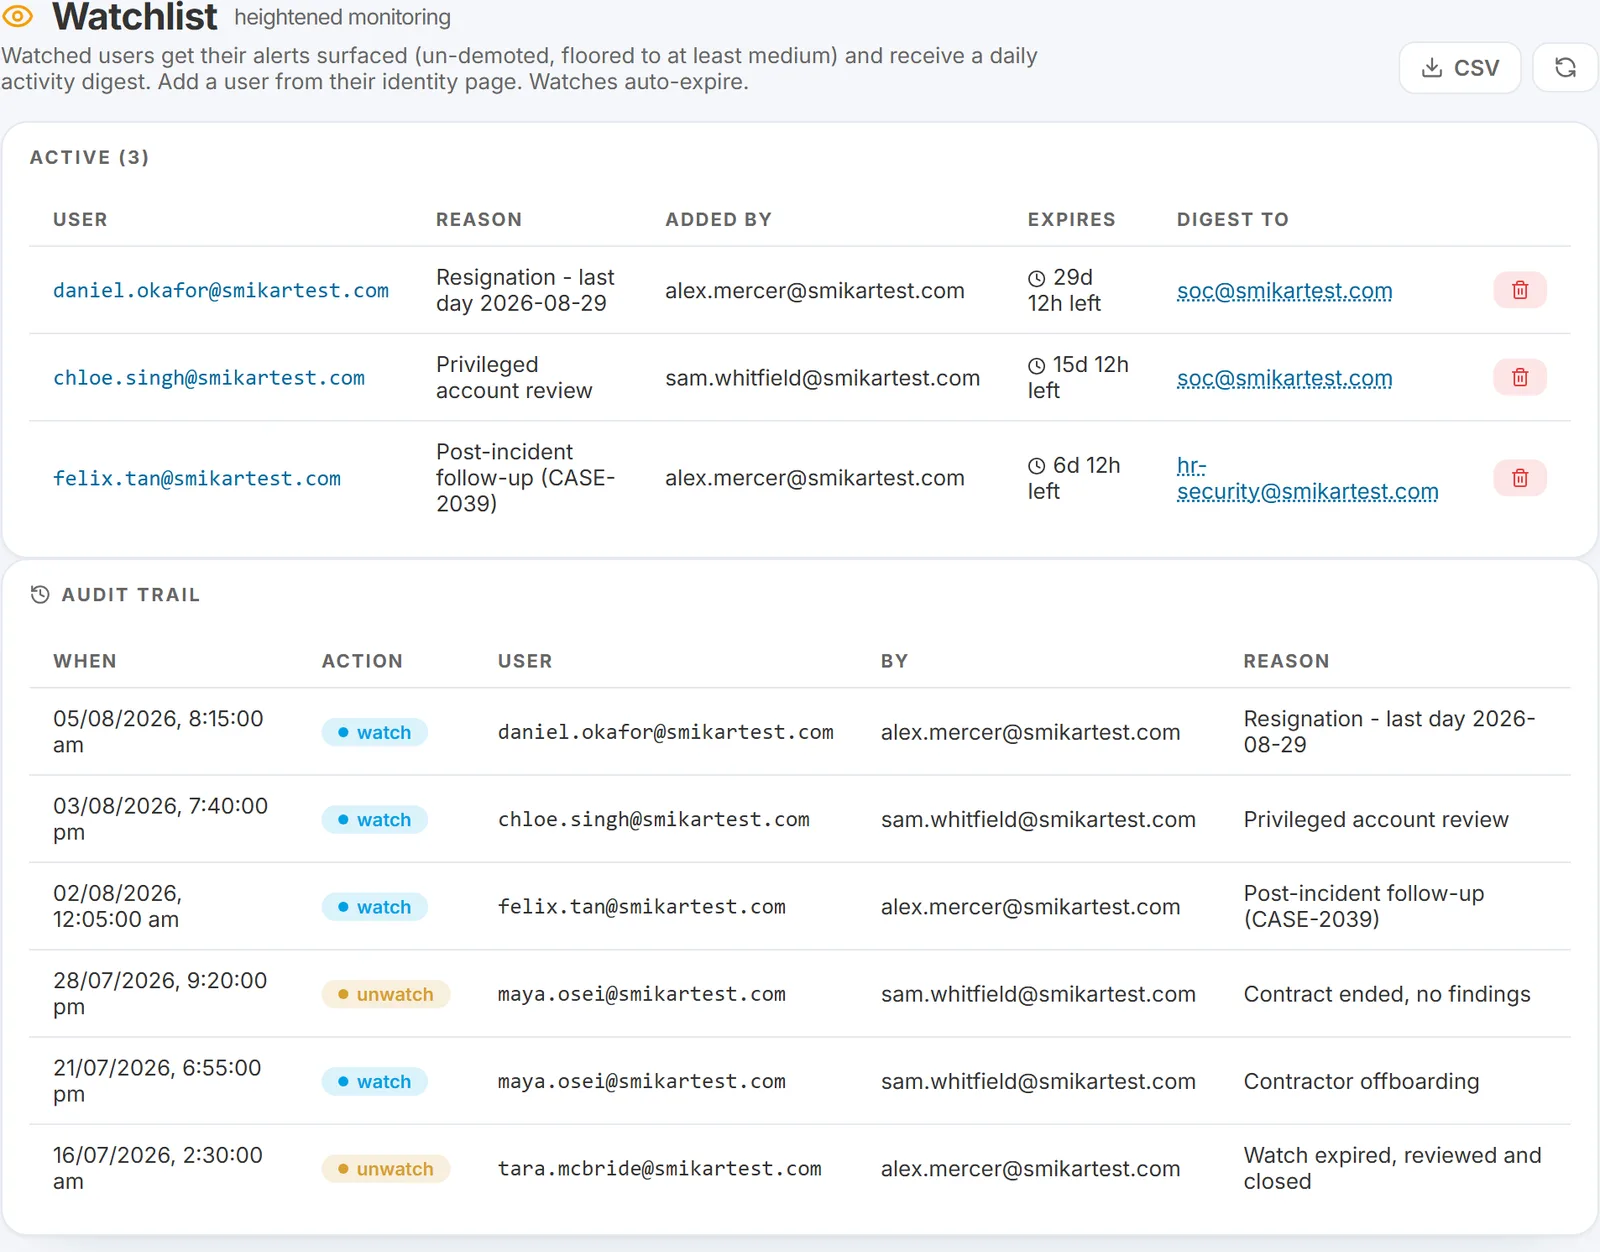
What it is: a way to place a named user under heightened monitoring for a set period - most commonly a departing employee on notice (the highest-risk window for data theft), but also performance-managed staff, privileged accounts, or someone you're following up after an incident.
Why it matters: normally Burrow quietens isolated, low-confidence signals to avoid noise. For a watched user you want those signals surfaced. Watching turns up the sensitivity for that one person only, for a limited time - you don't want it on everyone, and you don't want it forgotten, so it's built to be targeted and self-expiring.
Set it up:
- When HR flags a resignation (or you have a concern), find the person in Identities and open their page.
- Click Watch, enter a reason ("resignation - last day 29 July") and where the daily digest should go (your inbox, or a shared HR/security address).
- Until it expires you'll get their surfaced alerts and a daily activity digest. Review anytime from the person's page (Report for a summary, Logs for the raw evidence file), or manage all watches from the Watchlist page.
- It ends itself on the expiry date (30 days by default). To stop sooner, click Watching again.
How to know it's right: you should get one daily digest per watched person. If a watched leaver shows a spike in downloads or external shares, that's exactly what this is for - act on it before their last day.
See Watchlist: heightened monitoring.
See also
- First-week onboarding checklist - the day-by-day companion to this page.
- Internal domains, Sensitive sites and labels, Email recipients, Watchlist - the detailed reference for each setting.
- The tuning model and Tuning a noisy rule - the next step: adjusting how sensitive detection is, once the environment settings above are in place.
Need help? support@smikar.com.