Table of Contents
🚫 How to Exclude Document Libraries and Paths from Archiving
Excluding specific document libraries or folder paths from archiving allows you to prevent Squirrel from processing certain content during automated archiving policies. This is useful when you need to keep active working folders, sensitive directories, or frequently accessed content outside the archive scope.
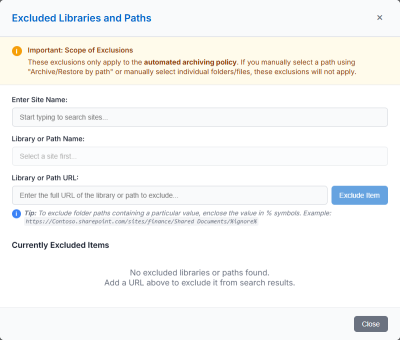
This guide explains how to use the Excluded Libraries and Paths modal to manage exclusions and leverage wildcard patterns for flexible path filtering.
🧭 Understanding Exclusion Scope
Important: Exclusions only apply to automated archiving policies. If you manually archive content using “Archive/Restore by path” or by selecting individual files/folders, these exclusions will not apply.
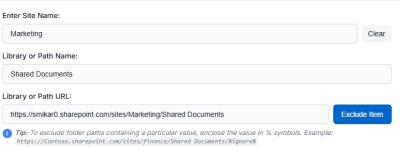
📋 Steps to Exclude a Document Library or Path
🎯 Using Wildcards to Exclude Path Patterns
Wildcards allow you to exclude multiple paths that share a common naming pattern, without needing to add each one individually.
Wildcard Syntax
Enclose any text value in percent symbols (%) to create a wildcard pattern:
https://Contoso.sharepoint.com/sites/finance/Shared Documents/%ignore%
This pattern will exclude any file path that contains “ignore” anywhere in its folder structure.
Examples of Excluded Paths
The following paths WILL be skipped by archiving:
- …/Shared Documents/someignorefolder/file.docx
- …/Shared Documents/IgnoreThis/file.xlsx
- …/Shared Documents/abcignorexyz/sub/file.pdf
- …/Shared Documents/folder1/folder2/ignore/file.docx
Examples of Non-Excluded Paths
The following paths will NOT be skipped:
- …/Shared Documents/approvals/file.docx (doesn't contain “ignore”)
- …/Shared Documents/versions/file.pdf (doesn't contain “ignore”)
- …/Shared Documents/ignoredoc.docx (wildcard only matches folder names, not filenames)
Tip: Wildcards are case-insensitive and match partial text within folder names.
🗑️ Removing an Exclusion
⚠️ Important Notes
- Path Format: Only forward slashes (/) are allowed in paths and URLs. Backslashes (\) are not supported and will trigger a validation error.
- Site Selection Required: You must select a site before you can choose a library or enter a path name.
- Automatic URL Generation: When you select a site and library, the URL is automatically generated. You can manually edit this if needed.
- Clear and Start Over: Use the “Clear” button next to the site search to reset all fields and start a new exclusion entry.
✅ Conclusion
Using the Excluded Libraries and Paths feature in Squirrel provides granular control over your archiving strategy:
- 🎯 Protect active working folders from automatic archiving
- 🔀 Use wildcards to exclude multiple paths with similar patterns
- 🛡️ Keep sensitive or frequently-accessed content readily available
- ⚙️ Maintain full control over what gets archived automatically
By following this guide, administrators can fine-tune their archiving policies to match organizational needs while ensuring critical content remains accessible in SharePoint Online.


